
How to Change Time Zone in Windows 11
The time zone of your computer can be a crucial factor when it comes to productivity and planning. Whether you are a world traveler, a remote worker, or just a casual computer user, changing the time zone in Windows 11 is a necessary step to stay on top of your schedule. In this guide, we will explain how to quickly and easily change the time zone in Windows 11, so you can stay organized and productive.
To change the time zone in Windows 11:
- In the search box on the taskbar, type Change the time zone, and then select Change the time zone from the results.
- Under Time zone, select your local time zone.
- Select Change time zone.

Change Time Zone in Windows 11
Windows 11 is an operating system released by Microsoft in 2020. It is the successor to Windows 10 and comes with many new features, including the ability to change the time zone. This feature allows users to set their computer to the correct time according to their current location. In this article, we will discuss how to change the time zone in Windows 11.
Step 1: Access the Settings Menu
The first step in changing the time zone in Windows 11 is to access the settings menu. This can be done by clicking on the Start menu, then selecting the gear icon for Settings. From here, you can access the Time & Language tab.
Step 2: Select the Time Zone
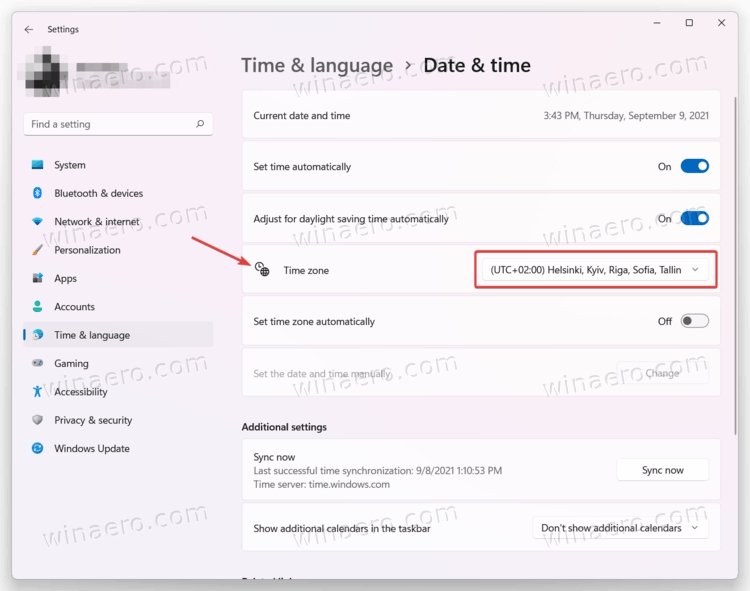
Once you are in the Time & Language tab, you can select the Time Zone option. This will open a new window with a list of available time zones. From here, you can select the one that best matches your current location.
Step 3: Confirm the Changes
After selecting the appropriate time zone, you will need to confirm the changes. This can be done by clicking the “Apply” button at the bottom of the window. Once you have done this, the time zone in Windows 11 will be updated.
Manage Date and Time Settings
In Windows 11, you also have the ability to manage the date and time settings. This can be done by accessing the Date & Time tab in the Settings menu. From here, you can adjust the date and time manually, or you can have Windows 11 automatically adjust it based on your current location.
Step 1: Access the Date & Time Tab
The first step in managing the date and time settings in Windows 11 is to access the Date & Time tab. This can be done by clicking on the Start menu, then selecting the gear icon for Settings. From here, you can access the Date & Time tab.
Step 2: Adjust the Date and Time
Once you are in the Date & Time tab, you can adjust the date and time manually. You can also enable the “Set time automatically” option, which will have Windows 11 adjust the time based on your current location.
Step 3: Confirm the Changes
After adjusting the date and time settings, you will need to confirm the changes. This can be done by clicking the “Apply” button at the bottom of the window. Once you have done this, the date and time settings in Windows 11 will be updated.
Manage the Clock Display
In Windows 11, you also have the ability to manage the clock display. This can be done by accessing the Clock tab in the Settings menu. From here, you can choose to display the time in either a 12-hour or 24-hour format.
Step 1: Access the Clock Tab
The first step in managing the clock display in Windows 11 is to access the Clock tab. This can be done by clicking on the Start menu, then selecting the gear icon for Settings. From here, you can access the Clock tab.
Step 2: Select the Clock Format
Once you are in the Clock tab, you can select either a 12-hour or 24-hour clock format. Once you have made your selection, you can click the “Apply” button at the bottom of the window to confirm the changes.
Step 3: Customize the Display
You also have the option to customize the clock display in Windows 11. This can be done by clicking the “Customize” button at the bottom of the window. From here, you can choose to display the date, day, and/or time in the clock display.
Conclusion
In this article, we discussed how to change the time zone, manage the date and time settings, and manage the clock display in Windows 11. By following the steps outlined above, you can easily make these changes in a few simple steps.
Top 6 Frequently Asked Questions
Q1. How do I change the time zone in Windows 11?
A1. To change the time zone in Windows 11, open the Settings window by clicking on the Start button and then selecting the gear icon. In the Settings window, select the “Time & Language” option. Click on the “Date & Time” option on the left side of the window. Then, click the “Change time zone” button. Finally, select the appropriate time zone from the drop-down menu and click “Ok” to save the changes.
Q2. How do I know what time zone I’m currently in?
A2. You can view your current time zone by opening the Settings window by clicking on the Start button and then selecting the gear icon. In the Settings window, select the “Time & Language” option. Click on the “Date & Time” option on the left side of the window. At the bottom of the window, you will see the “Time zone” section that displays the current time zone.
Q3. Can I change the time zone for multiple users in Windows 11?
A3. Yes, you can change the time zone for multiple users in Windows 11. Open the Settings window by clicking on the Start button and then selecting the gear icon. In the Settings window, select the “Time & Language” option. Click on the “Date & Time” option on the left side of the window. Then, click the “Change time zone” button and select the appropriate time zone from the drop-down menu. Next, select the “Change time zone for all users” checkbox and click “Ok” to save the changes.
Q4. Can I choose a custom time zone in Windows 11?
A4. Yes, you can choose a custom time zone in Windows 11. Open the Settings window by clicking on the Start button and then selecting the gear icon. In the Settings window, select the “Time & Language” option. Click on the “Date & Time” option on the left side of the window. Then, click the “Change time zone” button. Click the “Create a custom time zone” button, enter the required information and click “Ok” to save the changes.
Q5. Can I set my computer to automatically adjust the time zone?
A5. Yes, you can set your computer to automatically adjust the time zone in Windows 11. Open the Settings window by clicking on the Start button and then selecting the gear icon. In the Settings window, select the “Time & Language” option. Click on the “Date & Time” option on the left side of the window. Then, click the “Change time zone” button and select the appropriate time zone from the drop-down menu. Next, select the “Automatically adjust clock for daylight savings time” checkbox and click “Ok” to save the changes.
Q6. What should I do if my time zone is not listed in Windows 11?
A6. If your time zone is not listed in Windows 11, you can create a custom time zone. Open the Settings window by clicking on the Start button and then selecting the gear icon. In the Settings window, select the “Time & Language” option. Click on the “Date & Time” option on the left side of the window. Then, click the “Change time zone” button. Click the “Create a custom time zone” button, enter the required information and click “Ok” to save the changes. This will allow you to select a custom time zone that is not listed.
How To Change Time Zone on Windows 11
Changing the time zone in Windows 11 is a simple and straightforward process that doesn’t take more than a few clicks. This guide has provided you with step-by-step instructions to help you change the time zone on your Windows 11 device. Whether you’re a frequent traveler or just want to adjust the time zone to your current location, this guide has helped you make the necessary changes in a few easy steps. Now you can enjoy the accuracy of the time displayed on your Windows 11 system and stay on schedule!
How to Record Screen on Windows 11 With Audio
How to Clear Quick Access in Windows 11
Related Posts

Small businesses struggle with ERC tax credit submissions

10 Misunderstandings of the Employee Retention Credit

ERC Tax Credit 2023: Is the ERC tax credit still available?
