
How to Use Freeze Panes in Excel?
Are you looking for a way to keep your headers visible as you scroll down a large spreadsheet in Microsoft Excel? Freeze panes is a great tool that enables you to lock a certain row or column in place, so it remains visible as you scroll. In this article, we’ll show you how to use freeze panes in Excel and share some helpful tips for mastering this valuable feature.
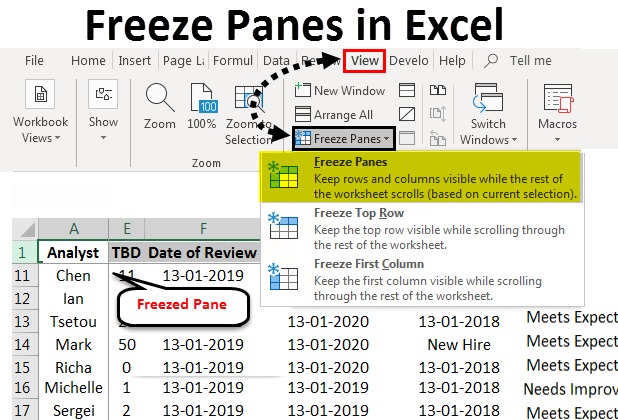
Freeze Panes in Excel: To freeze panes in Excel, first select the row below or column to the right of the cells that you want to keep visible when you scroll. Next, select the View tab from the ribbon and then Freeze Panes from the Window group.
- Open the Excel document that contains the cells you want to freeze.
- Select the row below or column to the right of the cells that you want to keep visible when you scroll.
- Select the View tab from the ribbon.
- Select Freeze Panes from the Window group.
- Select either Freeze Panes, Freeze Top Row or Freeze First Column from the list.

What is Freeze Panes in Excel?
Freeze Panes in Excel is a useful feature that allows users to keep certain rows and columns visible while scrolling through the worksheet. It is especially useful when working with large datasets that have multiple columns and rows. This feature enables the user to keep the headings visible at all times, even when scrolling down or to the right. This makes it much easier to identify the data in a particular column or row and makes it easier to work with large datasets.
Freeze Panes is an important feature of Excel and is a great tool for anyone who needs to work with large data sets. It allows the user to keep certain rows and columns visible while scrolling through the worksheet. This makes it easier to identify and work with the data.
How to Use Freeze Panes in Excel?
Using Freeze Panes in Excel is fairly straightforward. To get started, the user needs to select the rows and/or columns that they want to keep visible. This can be done by clicking and dragging the mouse to select the desired area. Once the area is selected, the user needs to click the “Freeze Panes” button located in the View tab. This will freeze the selected rows and/or columns in place and they will remain visible even when scrolling through the worksheet.
The user can also use the Freeze Panes feature to freeze multiple rows and/or columns. This can be done by selecting the desired area, then clicking the “Freeze Panes” button, and then clicking the “Freeze Panes” drop-down arrow. From here, the user can select the desired number of rows or columns to freeze.
Once the desired rows and/or columns have been frozen, the user can easily navigate through the worksheet without losing their place. To unfreeze the rows and/or columns, the user simply needs to click the “Unfreeze Panes” button located in the View tab.
Tips and Tricks for Using Freeze Panes in Excel
It is important to remember that when using Freeze Panes, it is important to select the desired area before clicking the “Freeze Panes” button. If the area is not selected first, then it will not be frozen in place.
If the user wants to freeze multiple rows and/or columns, they should use the “Freeze Panes” drop-down arrow to select the desired number of rows and/or columns. This will ensure that all the desired rows and/or columns are frozen in place.
Finally, it is important to remember to click the “Unfreeze Panes” button when the user is done using the Freeze Panes feature. This will ensure that the rows and/or columns are not frozen in place when the user no longer needs them to be.
Common Problems with Freeze Panes in Excel
One of the most common problems encountered when using Freeze Panes in Excel is that the rows and/or columns do not freeze in place. This is usually due to the fact that the area was not selected before clicking the “Freeze Panes” button. To avoid this issue, it is important to always select the desired area before clicking the “Freeze Panes” button.
Another common issue is that the rows and/or columns are not frozen in the correct place. This is usually due to the fact that the user has selected the wrong area. To avoid this issue, it is important to always select the desired area before clicking the “Freeze Panes” button.
Finally, it is important to remember to always click the “Unfreeze Panes” button when the user is done using the Freeze Panes feature. If this is not done, then the rows and/or columns will remain frozen in place even when they are no longer needed.
Troubleshooting Freeze Panes in Excel
Check If the Area is Selected Before Clicking the Freeze Panes Button
One of the most common issues encountered when using Freeze Panes in Excel is that the rows and/or columns do not freeze in place. To avoid this issue, it is important to always select the desired area before clicking the “Freeze Panes” button.
Check If the Area Selected is Correct
Another common issue is that the rows and/or columns are not frozen in the correct place. This is usually due to the fact that the user has selected the wrong area. To avoid this issue, it is important to always select the desired area before clicking the “Freeze Panes” button.
Remember to Click the Unfreeze Panes Button
Finally, it is important to remember to always click the “Unfreeze Panes” button when the user is done using the Freeze Panes feature. If this is not done, then the rows and/or columns will remain frozen in place even when they are no longer needed.
Top 6 Frequently Asked Questions
What is Freeze Panes in Excel?
Freeze Panes in Excel is a feature of the spreadsheet software which allows you to lock certain rows or columns so that they remain visible while you scroll through other parts of the spreadsheet. This means you can keep your column and row labels visible while you scroll through the rest of the data. This makes it much easier to analyze data, since you can keep an eye on the labels while you scroll through the data.
How do I Use Freeze Panes in Excel?
Using Freeze Panes in Excel is relatively straightforward. First, you need to select a row or a column that you want to be locked into view. Then, you can select the ‘View’ tab at the top of the spreadsheet. From here, you can select the ‘Freeze Panes’ option and then choose the option to ‘Freeze Panes’ or ‘Freeze Top Row’ or ‘Freeze First Column’. This will lock the selected row or column into view when you scroll through the rest of the spreadsheet.
What are the Benefits of Using Freeze Panes in Excel?
Using Freeze Panes in Excel can be extremely helpful for analyzing data. It makes it much easier to keep track of the row and column labels while scrolling through the rest of the data. This makes it much easier to identify patterns in the data and make informed decisions. Additionally, Freeze Panes can be used to help organize data by keeping certain rows or columns visible.
What are the Limitations of Using Freeze Panes in Excel?
The primary limitation of using Freeze Panes in Excel is that it can only be used to lock rows and columns into view. It cannot be used to lock individual cells or groups of cells into view. Additionally, it is not possible to freeze multiple rows or columns at once.
How do I Unfreeze the Panes in Excel?
Unfreezing the panes in Excel is relatively straightforward. First, you need to select the ‘View’ tab at the top of the spreadsheet. Then, you can select the ‘Freeze Panes’ option and then choose the option to ‘Unfreeze Panes’. This will unlock all of the previously frozen panes and allow you to move freely around the spreadsheet.
Are There Any Alternatives to Using Freeze Panes in Excel?
Yes, there are some alternatives to using Freeze Panes in Excel. One option is to use the ‘Split’ feature, which allows you to divide the spreadsheet into multiple panes. This allows you to scroll through different parts of the spreadsheet while keeping certain rows or columns visible. Additionally, you can use the ‘Filter’ feature to sort the data in the spreadsheet and make it easier to analyze.
Overall, using Freeze Panes in Excel is a simple yet powerful tool that can make your spreadsheets easier to navigate, allowing you to quickly analyze data and draw meaningful conclusions. With just a few clicks, you can freeze any row or column of data and ensure it is always visible and accessible. Try Freeze Panes today and you’ll be sure to save time and make the most of your Excel spreadsheets.
How to Move a Group of Cells in Excel?
How to Select Two Columns in Excel Mac?
Related Posts

Small businesses struggle with ERC tax credit submissions

10 Misunderstandings of the Employee Retention Credit

ERC Tax Credit 2023: Is the ERC tax credit still available?
