

How to Send Secure Email in Outlook 365?
Are you looking for an easy way to keep your emails secure and private? Microsoft Outlook 365 offers a secure mail feature that allows you to efficiently and effectively send secure emails with ease. In this guide, we’ll explain how to quickly and easily send secure emails in Outlook 365. You’ll learn how to encrypt emails, how to set an expiration date on emails, and how to ensure your emails are safe from unwanted eyes. With this guide, you can have peace of mind that your emails will remain secure and private.
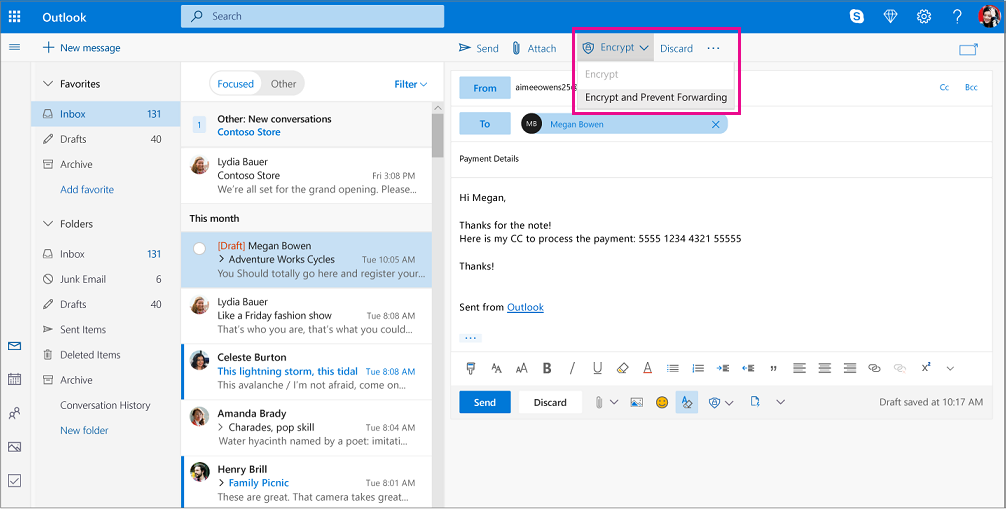
- Open Outlook 365 and select the “New Email” option.
- Enter the recipient’s email address, subject line, and message.
- Select “Options” and click “More Options.”
- Select “Encrypt” and choose the encryption type.
- Click “Send” to send the encrypted email.
Steps to Send Secure Email in Outlook 365
Outlook 365 provides enhanced security features that can help protect your emails from being accessed by unauthorized users. Sending secure emails in Outlook 365 is simple, and it’s a great way to ensure that your emails are safe from prying eyes. In this article, we will explore how to send secure emails in Outlook 365.
The first step is to log into your Outlook 365 account. Once you have logged in, you will need to open the Outlook 365 email window. You can do this by clicking on the “Mail” icon in the main Outlook 365 window. Once you have opened the email window, you will need to locate the “Compose” button located in the top left corner of the email window.
Add Email Recipients
Once you have clicked on the “Compose” button, you will be taken to a new window where you can begin composing your email. The first thing you will need to do is to add the email recipients. To do this, simply type the email addresses of the people you want to receive your email in the “To” field.
Next, you will need to enter the subject of the email in the “Subject” field. You can also add a message in the main body of the email. Once you have completed composing the email, you will need to click on the “Secure” icon located in the top right corner of the window.
Enable Encryption
Once you click on the “Secure” icon, a new window will open that will allow you to choose the type of encryption that you want to use. There are different types of encryption available, and you can choose the one that best suits your needs. Once you have selected the type of encryption you want to use, you will need to click on the “Send” button to send the email.
Verify Security Settings
Once the email has been sent, you will need to verify the security settings to make sure that the email is secure. To do this, click on the “Settings” icon located in the top right corner of the email window. In the “Settings” window, you will be able to view the security settings for the email.
Check Email Delivery
The last step is to check the delivery of the email. To do this, simply click on the “Inbox” icon in the main Outlook 365 window. You will be able to view the emails that have been sent to you in the “Inbox” window. You can also check the delivery of the emails that you have sent by clicking on the “Sent” folder in the same window.
Conclusion
Sending secure emails in Outlook 365 is easy, and it can help ensure that your emails remain private. By following the steps outlined in this article, you can easily configure your Outlook 365 account to send secure emails.
Top 6 Frequently Asked Questions
1. What is Secure Email?
Secure email is an encrypted method of sending emails that ensures the message is only seen by the intended recipient. Secure email uses encryption algorithms to protect the contents of the message from being read by anyone other than the intended recipient. This ensures that even if the message is intercepted in transit, the contents of the message cannot be read by anyone other than the intended recipient.
2. How does Secure Email Work?
Secure email works by encrypting the contents of the message using an encryption algorithm. When the message is sent, it is encrypted and can only be decrypted by the intended recipient. This means that even if the message is intercepted in transit, the contents of the message cannot be read by anyone other than the intended recipient.
3. How do I Send a Secure Email in Outlook 365?
To send a secure email in Outlook 365, you first need to enable the encryption feature. To do this, go to the “File” tab and select “Options”. From here, select the “Trust Center” tab and then select “Email Security”. Here you can enable the encryption feature and specify the type of encryption you want to use. Once the encryption feature is enabled, you can then compose a message and select the “Encrypt” button to encrypt the message before it is sent.
4. What are the Benefits of Using Secure Email?
The primary benefit of using secure email is improved security for your messages. By encrypting your messages, you can be sure that the contents of your messages are only seen by the intended recipient. This means that even if your message is intercepted in transit, the contents of the message cannot be read by anyone other than the intended recipient.
5. What are the Limitations of Secure Email?
One limitation of secure email is that it is only compatible with other users who have enabled encryption. If the recipient of your message does not have encryption enabled, then the message will not be secure and could be intercepted in transit.
6. Do I Need Additional Software or Hardware to Use Secure Email?
No additional software or hardware is required to use secure email in Outlook 365. All you need is a supported version of Outlook, and you can use the built-in encryption feature to send secure emails.
Microsoft 365 Outlook Encrypted Email Demo
Sending secure email in Outlook 365 is an important task for businesses and individuals who need to protect their confidential information. With the right steps and proper encryption, you can ensure that your emails are secure and properly protected. By using Encrypted Email, you can ensure that your emails will remain secure and confidential, and you can trust that your data is safe. The steps outlined above provide a quick and easy way to send secure email in Outlook 365 and protect your confidential data.
How to Put a Line Through Text in Outlook?
How to Remove Profile Picture From Outlook?
Related Posts

Small businesses struggle with ERC tax credit submissions

10 Misunderstandings of the Employee Retention Credit

ERC Tax Credit 2023: Is the ERC tax credit still available?
