
How to Insert a Slicer in Excel?
Are you looking for an easy way to create powerful data visualizations in Excel? Slicers are a great way to quickly analyze data and can be used to instantly filter data in pivot tables and charts. In this article, we’ll be discussing how to insert a slicer in Excel so you can take your data analysis to the next level.
How to Insert a Slicer in Excel?
- Open the Excel workbook that contains the table or data range.
- Select the table or data range.
- Go to the Insert tab in the ribbon.
- Click the Slicer button.
- Select the fields you want to use as filters.
- Click OK.
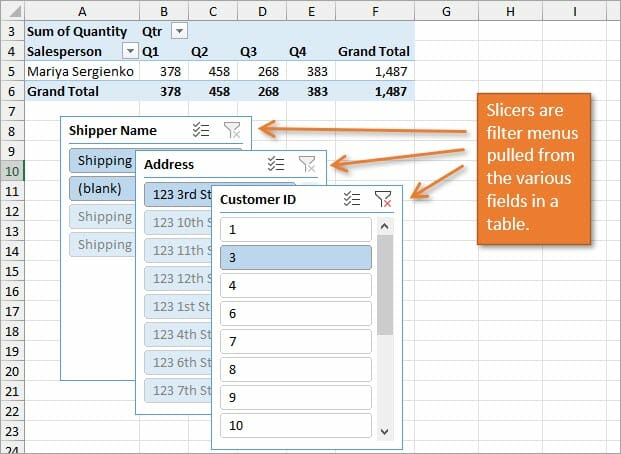
Slicers appear on the worksheet as interactive buttons that you can use to filter the table or data range.

What is a Slicer in Excel?
A slicer in Excel is an interactive tool that allows you to quickly filter and analyze data in a PivotTable or PivotChart. It is similar to the filter function but provides an intuitive and easy-to-use graphical interface. Slicers are especially useful when dealing with large amounts of data, as they can quickly filter and isolate the data you need.
Slicers are especially helpful when you want to quickly analyze and display data without having to manually apply filters to a PivotTable or PivotChart. They can be used to quickly filter data by category, date range, or other criteria, and can be customized to fit your specific needs.
How to Insert a Slicer in Excel
The first step in inserting a slicer in Excel is to create a PivotTable or PivotChart. To do this, select the data you want to analyze and click the Insert tab. On the Insert tab, click the PivotTable or PivotChart button. This will open a new window that allows you to select the data you want to analyze.
Once you have selected the data, click the Options tab and select the Slicer option. This will open the Slicer Settings window. In this window, you can select which fields you want to include in the slicer. You can also customize the slicer by selecting a specific color, size, and layout.
Setting up Your Slicer
Once you have selected the fields you want to include in the slicer, you can customize it further by selecting the fields you want to include in the slicer. To do this, click the Options tab and select the Field Settings option. This will open a new window where you can set up the fields you want to include in the slicer.
You can also customize the appearance of the slicer by selecting the Style and Layout options. This will allow you to change the background color and font size of the slicer, as well as the number and type of columns you want to include.
Using Your Slicer
Once you have set up your slicer, you can use it to quickly filter and analyze your data. To use the slicer, simply select the fields you want to filter and then click the Apply button. This will filter the data based on the criteria you have selected.
You can also use the slicer to quickly create charts and graphs. To do this, select the fields you want to include in the chart or graph and then click the Chart or Graph button. This will open a new window where you can customize the chart or graph based on the criteria you have selected.
Tips for Using Slicers in Excel
Keep it Simple
When using slicers in Excel, it is important to keep the design and layout of the slicer as simple as possible. This will make it easier to use and understand. It is also important to make sure that the fields you select are relevant to the data you are analyzing.
Customize the Layout
You can customize the layout of a slicer by selecting the Style and Layout options. This will allow you to change the background color and font size of the slicer, as well as the number and type of columns you want to include. This will make it easier to quickly analyze and display data.
Frequently Asked Questions
What is a Slicer in Excel?
A Slicer in Excel is an interactive tool that can be used to filter and analyze data in a PivotTable or PivotChart. It acts as a visual filter for data and can be used to quickly find and display only the data of interest. Slicers are easy to use and can be customized to fit your needs.
How Do I Insert a Slicer in Excel?
To insert a Slicer in Excel, first select the PivotTable or PivotChart you wish to filter. Then, click the Insert tab on the ribbon and select Slicer. A dialog box will open, allowing you to select the fields you wish to filter. Select the fields, click OK, and the Slicer will be inserted.
What are the Benefits of Using a Slicer in Excel?
Using a Slicer in Excel has many benefits. Firstly, it makes it easier to filter and analyze data. Slicers also provide a visual representation of the data, which can be useful for quickly understanding the results of a filter. Additionally, Slicers are highly customizable, allowing you to tailor them to suit your needs.
Can I Use a Slicer in Excel with Other Charts?
Yes, you can use a Slicer in Excel with other charts. For example, you can use a Slicer with a column chart to filter the data and quickly visualize the results. Additionally, you can use a Slicer with a line chart, a pie chart, or any other type of chart that is compatible with the PivotTable or PivotChart.
What is the Difference Between a Slicer and a Filter in Excel?
The main difference between a Slicer and a Filter in Excel is that a Slicer is a visual tool, while a Filter is a more traditional type of filtering. A Filter allows you to filter data based on criteria you specify, while a Slicer provides a visual representation of the data and allows you to quickly find and display only the data of interest.
Are Slicers Compatible with All Versions of Excel?
Yes, Slicers are compatible with all versions of Excel. They can be used in Excel 2010 and later versions of the software. Additionally, Slicers are compatible with both Windows and Mac versions of Excel.
Quick Way to Insert Slicers in Excel
By following the above steps, you can easily insert a slicer in Excel, and it can be a great way to quickly view and analyze data. Slicers are user-friendly and can be a great visual tool for exploring and understanding data. By using slicers, you can better analyze and present data, making it easier to identify trends and make decisions.
Related Posts

Small businesses struggle with ERC tax credit submissions

10 Misunderstandings of the Employee Retention Credit

ERC Tax Credit 2023: Is the ERC tax credit still available?
