
How to Change Powerpoint From Landscape to Portrait?
Powerpoint presentations are a great tool for sharing ideas and information. However, sometimes the layout of the presentation may not look quite right. When this happens, it’s important to know how to change the layout of the presentation from landscape to portrait. In this article, we’ll explain how to make the switch quickly and easily. So if you’re ready to transform your Powerpoint presentation, let’s get started!
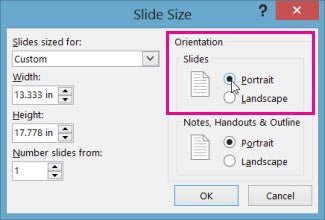
To change the orientation of your PowerPoint presentation from landscape to portrait, you can follow the steps mentioned below:
- Open your PowerPoint presentation.
- Go to the ‘Design’ tab and click on ‘Slide Size’.
- A dialog box will appear, select ‘Portrait’ from the dropdown menu.
- Click on ‘OK’ to save the changes.
You have now successfully changed the orientation of your PowerPoint presentation from landscape to portrait.

How to Change a PowerPoint Presentation from Landscape to Portrait
Switching a PowerPoint presentation from landscape to portrait orientation can be a useful way to add variety to a presentation or to make the most of the available space. Changing the orientation of a PowerPoint presentation is a quick and easy process that can be done in a few simple steps.
Step 1: Open the Desired Presentation
The first step in changing the orientation of a PowerPoint presentation is to open the desired presentation. The PowerPoint presentation can be opened from the file folder or from the list of recently opened presentations. Once the presentation is open, the next step is to click on the “Design” tab at the top of the screen.
Step 2: Select the Page Setup Option
The next step is to select the “Page Setup” option from the “Design” tab. This will open the Page Setup window, which contains several options for changing the orientation of the presentation. In the Page Setup window, select the “Slides” tab and then select “Portrait” from the “Orientation” drop-down menu.
Step 3: Finalize the Change
The final step in changing the orientation of a PowerPoint presentation is to click the “OK” button at the bottom of the Page Setup window. This will finalize the change and the PowerPoint presentation will now be in portrait orientation.
Step 4: Check the Changes
The final step is to check the changes by viewing the presentation in the Slide Show mode. This will allow the user to make sure that the changes have been applied correctly, and that the presentation looks as desired.
Step 5: Save the Changes
The last step is to save the changes to the PowerPoint presentation. This can be done by clicking the “Save” button at the top of the screen. This will ensure that the changes are saved and that the PowerPoint presentation remains in the portrait orientation.
Related FAQ
Q1. What is the difference between landscape and portrait orientation in Microsoft PowerPoint?
A1. Landscape orientation is when the width of the slide is greater than the height, while portrait orientation is when the height of the slide is greater than the width. Landscape orientation is typically used for displaying charts, tables, and other graphical elements, while portrait orientation is better for displaying text-heavy content.
Q2. How do I change the orientation of my PowerPoint presentation from landscape to portrait?
A2. To change the orientation of a PowerPoint presentation from landscape to portrait, open the presentation and click on the “Design” tab. From here, select “Page Setup” from the “Slide Size” drop-down menu. This will open a pop-up window where you can select the orientation you would like. Select “Portrait” from the drop-down menu and click “OK” to save your changes.
Q3. How do I resize my slides to fit the new orientation?
A3. Once you have changed the orientation of your presentation, you will need to resize the slides to fit. To do this, open the presentation and click on the “Design” tab. From here, select “Slide Size” and then “Custom Slide Size”. This will open a pop-up window where you can select the size you would like your slides to be. Select “Portrait” from the drop-down menu and then enter the desired size for your slides. Click “OK” to save your changes.
Q4. What if I need to change the orientation of only one slide in my presentation?
A4. If you need to change the orientation of only one slide in your presentation, open the presentation and navigate to the slide you would like to change. Then, click on the “Design” tab and select “Page Setup” from the “Slide Size” drop-down menu. This will open a pop-up window where you can select the orientation you would like. Select “Portrait” from the drop-down menu and click “OK” to save your changes.
Q5. What if I need to change the size of only one slide in my presentation?
A5. If you need to change the size of only one slide in your presentation, open the presentation and navigate to the slide you would like to change. Then, click on the “Design” tab and select “Custom Slide Size”. This will open a pop-up window where you can enter the desired size for your slide. Select “Portrait” from the drop-down menu and then enter the desired size for your slide. Click “OK” to save your changes.
Q6. Are there any other settings I need to change when I change the orientation of my presentation?
A6. When you change the orientation of your presentation, you may need to make other changes in order to ensure that everything looks correct. For example, you may need to adjust the margins and layout of the presentation, or you may need to adjust the size of any images or text boxes that are on the slides. Additionally, you may need to adjust the size of the text or the font used in order to make sure it is legible for your audience.
How to change from Landscape to Portrait in Powerpoint 2016
Changing your PowerPoint presentation from landscape to portrait can be a great way to emphasize important information and make your presentation look more professional. With just a few clicks, you can easily change the orientation of your slides to fit the look you’re going for. All in all, it’s a simple process that can make a big difference in the appearance and impact of your presentation. So the next time you want to give your PowerPoint presentation a fresh look, remember that changing your slides from landscape to portrait is a quick and easy way to do it.
How to Run Mcafee Scan on Windows 10?
How to Recover Deleted Partition in Windows 10?
Related Posts

Small businesses struggle with ERC tax credit submissions

10 Misunderstandings of the Employee Retention Credit

ERC Tax Credit 2023: Is the ERC tax credit still available?
