
How to Add a Header in Excel?
If you’re looking for an easy way to add a header row to your Excel spreadsheet, then you’ve come to the right place. In this tutorial, we’ll walk you through the steps of adding a header to your Excel spreadsheet, as well as discuss the various options you have when creating your header. With a few simple steps, you’ll be able to easily add a header to your spreadsheet and make it look more organized and professional. So let’s get started!
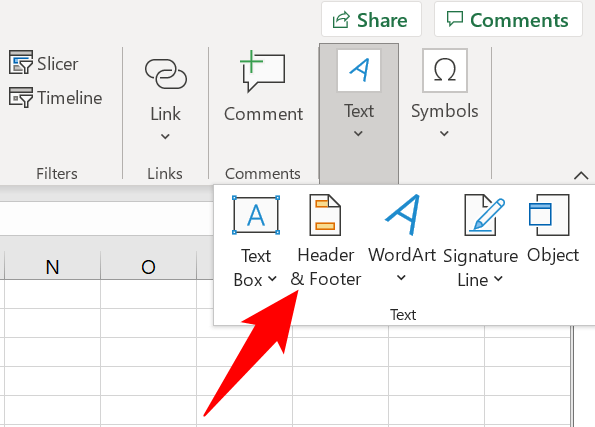
How to add a Header in Excel?
- Open the Excel spreadsheet you wish to add a header to.
- Click on the “Insert” tab located at the top of the page.
- Click on the “Header & Footer” option located in the Text group.
- Add your desired header into the “Header” box located at the top of the page.
- Click the “Close Header & Footer” button located at the bottom right corner of the page.
- Your header has now been added to the Excel spreadsheet.

How to Insert a Header in Excel
Excel is a powerful program that can help you organize and analyze your data. It also lets you create a header for your worksheet, which can be useful for providing additional information or for providing a visual cue when you’re navigating your data. Here’s how to add a header in Excel.
Create the Header
The first step to adding a header in Excel is to create the header itself. You can create a header by entering text into the top row of your worksheet. You can also add images or shapes to your header to make it stand out. Once you’ve created the header, you can move it to the top of the worksheet by dragging it to the top row.
Format the Header
Once you’ve created the header, you can format it to make it stand out even more. To do this, select the header cells, go to the Home tab, and select the desired formatting options, such as font size, font color, and background color. You can also add a border to the header to make it stand out even more.
Adjust the Worksheet Print Settings
Once you’ve created and formatted the header, the next step is to adjust the worksheet print settings so that the header will appear on all printed pages. To do this, go to the Page Layout tab and select the “Print Titles” option. Then, select the row that contains the header and click “OK”. This will ensure that the header will appear on all printed pages.
Align the Header
The last step is to align the header so that it will appear at the top of the page when it’s printed. To do this, select the header cells, go to the Home tab, and select the “Align Top” option. This will ensure that the header will appear at the top of each printed page.
Save the Worksheet
Once you’ve added the header, formatted it, adjusted the worksheet print settings, and aligned it, the last step is to save the worksheet. To do this, go to the File tab and select the “Save” option. This will ensure that your header will be saved and ready to use when you need it.
Conclusion
Adding a header in Excel is a simple process that can be completed in a few steps. To add a header, create the header, format it, adjust the worksheet print settings, align it, and save the worksheet. Once you’ve completed these steps, your header will be ready to use whenever you need it.
Frequently Asked Questions
Question 1: How do I add a header in Excel?
Answer: To add a header in Excel, you will first need to select the cell or range of cells that you want to add a header to. You can then go to the ‘Insert’ tab in the ribbon at the top of the Excel window and select ‘Header & Footer.’ This will open a dialog box with options for adding a header. You can enter text into the header box, as well as add images and other visual elements. Once you have made your desired changes, click ‘OK’ to apply the header.
Question 2: How do I format a header in Excel?
Answer: Once you have added a header to a cell or range of cells in Excel, you can format it to your liking. To do this, select the header and then go to the ‘Home’ tab in the ribbon at the top of the Excel window. Here, you will find an array of formatting options, such as font size, color, and alignment. You can also use the ‘Borders’ drop-down menu to add lines around the header.
Question 3: Can I add different headers to different sheets in Excel?
Answer: Yes, you can add different headers to different sheets in Excel. To do this, select the cell or range of cells that you want to add a header to, then go to the ‘Insert’ tab in the ribbon at the top of the Excel window and select ‘Header & Footer.’ This will open a dialog box with options for adding a header. You can then set the sheet that the header should apply to in the ‘Apply to’ drop-down menu.
Question 4: Can I add multiple headers to the same sheet in Excel?
Answer: Yes, you can add multiple headers to the same sheet in Excel. To do this, select the cell or range of cells that you want to add a header to, then go to the ‘Insert’ tab in the ribbon at the top of the Excel window and select ‘Header & Footer.’ This will open a dialog box with options for adding a header. You can then select the ‘Different First Page’ checkbox to apply a different header to the first page of the sheet.
Question 5: Can I use formulas in a header in Excel?
Answer: Yes, you can use formulas in a header in Excel. To do this, select the cell or range of cells that you want to add a header to, then go to the ‘Insert’ tab in the ribbon at the top of the Excel window and select ‘Header & Footer.’ This will open a dialog box with options for adding a header. You can then select the ‘Formula’ radio button and enter your formula in the text box.
Question 6: How do I delete a header in Excel?
Answer: To delete a header in Excel, select the cell or range of cells that has the header you want to delete. Then, go to the ‘Insert’ tab in the ribbon at the top of the Excel window and select ‘Header & Footer.’ This will open a dialog box with options for adding a header. You can then select the ‘None’ radio button and click ‘OK’ to apply the changes and delete the header.
How to Insert Header and Footer in Excel (Fastest Method)
Adding a header in Excel is an easy process that can be completed in just a few steps. Whether you are creating a spreadsheet or formatting a chart, adding a header can make it easier for you to find the information you are looking for. With a few simple clicks of the mouse, you can add a header to your Excel document that will help you quickly and efficiently find the information you need.
How to Convert Numbers to Text in Excel?
How to Enable Dial Pad in Microsoft Teams?
Related Posts

Small businesses struggle with ERC tax credit submissions

10 Misunderstandings of the Employee Retention Credit

ERC Tax Credit 2023: Is the ERC tax credit still available?
