
How to Apply All Borders in Excel?
Are you feeling overwhelmed by Excel’s vast array of options for formatting your documents? Do you want to add a professional and polished look to your spreadsheets? Then you’ve come to the right place! In this tutorial, we’ll be discussing how to apply all borders in Excel with ease. We’ll walk through the different options available, explore how to customize your borders, and provide tips to make the most of your formatting. So, let’s get started and learn how to apply all borders in Excel!
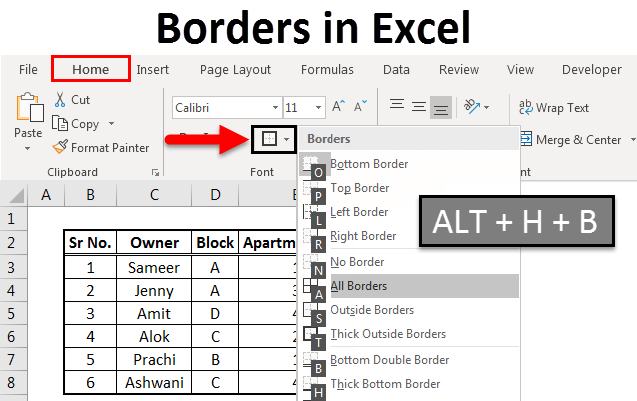
To apply all borders in Microsoft Excel, follow the steps below:
- Open the Excel spreadsheet.
- Select the cells that you want to add a border around.
- Go to the ‘Home’ tab and click the ‘Borders’ button in the ‘Font’ section.
- Select the type of border that you want to apply.
- Your selected cells will now have a border around them.

Applying All Borders in Excel
Adding borders to data in Excel can help to draw attention to specific cells, columns, or rows. It can also help to make your data easier to read and understand. This guide will explain how to apply all borders in Excel using the Format Cells dialog box.
Selecting Cells to Add Borders To
The first step to adding borders to your data in Excel is to select the cells you want to add borders to. You can do this by clicking and dragging your mouse over the cells you want to select, or you can click on the first cell and then press and hold the Shift key and click on the last cell.
Once your cells are selected, you can move on to the next step.
Opening the Format Cells Dialog Box
The next step is to open the Format Cells dialog box. This can be done by right-clicking on the selected cells and then selecting the “Format Cells” option. This will open the Format Cells dialog box, which will allow you to customize the look of your data.
Adding All Borders
Once the Format Cells dialog box is open, you can select the “Borders” tab and then click on the “All Borders” button. This will add a border to all the sides of the selected cells. You can also customize the border by clicking on the “Line Style” dropdown and selecting the style of line you want to use.
Choosing a Color for Borders
If you want to add a color to your borders, you can do so by clicking on the “Color” dropdown and selecting the color you want. You can also customize the width of the border by clicking on the “Width” dropdown and selecting the width you want.
Previewing and Applying Changes
Once you have finished customizing the look of your borders, you can click on the “Preview” button to see how the changes will look. If you like what you see, you can click on the “OK” button to apply the changes. If you don’t like the changes, you can click on the “Cancel” button and try again.
Saving Changes
Once you have applied the changes, you can save them by clicking on the “File” menu and selecting the “Save” option. This will save the changes to your workbook and make them permanent.
Conclusion
Adding borders to data in Excel can help to draw attention to specific cells, columns, or rows. This guide has explained how to apply all borders in Excel using the Format Cells dialog box. By following these steps, you can customize the look of your data and make it easier to read and understand.
Related FAQ
Question 1: What is the easiest way to apply all borders in Excel?
Answer: The easiest way to apply all borders in Excel is to use the “Format as Table” command. This command is located in the Home tab of the Ribbon. When selected, the Format as Table dialog box will appear, allowing you to choose a style of table and the ranges of cells you want to include in the table. After selecting a style, click the OK button, and all of the cells in the selection will be formatted with the chosen style’s borders.
Question 2: What are the different types of borders available in Excel?
Answer: Excel offers a variety of border styles, including solid, dashed, double, and more. There are also options to customize the color, line style, and width of each border. Additionally, Excel allows you to choose between different types of corners, such as mitered, round, or beveled.
Question 3: How do I remove all borders in Excel?
Answer: To remove all borders in Excel, select the range of cells you want to remove the borders from, then click the “Borders” button in the Font section of the Home tab. A drop-down menu will appear, allowing you to select the “No Border” option. This will remove all borders from the selected range of cells.
Question 4: How do I select a specific area to apply borders to in Excel?
Answer: To select a specific area to apply borders to in Excel, click and drag your mouse across the desired range of cells. The cells will be highlighted in a gray color, indicating that they are selected. Once the desired range is selected, you can use the “Borders” button in the Font section of the Home tab to apply the desired border style to the cells.
Question 5: Can I apply different border styles to different parts of the same selection of cells?
Answer: Yes, you can apply different border styles to different parts of the same selection of cells in Excel. To do this, select the range of cells you want to apply different borders to, then click the “Format” button in the Home tab. This will open the Format Cells dialog box, where you can choose different border styles for each side of the selection.
Question 6: Can I apply borders to an entire worksheet?
Answer: Yes, you can apply borders to an entire worksheet in Excel. To do this, select the entire worksheet by clicking the small box to the left of the row 1 and above column A. Then click the “Borders” button in the Font section of the Home tab and select the desired border style. This will apply the selected border style to all of the cells in the worksheet.
Add Borders and Draw Borders in Excel
Writing a report or a spreadsheet in Microsoft Excel can be a daunting task. But, with a few simple steps, you can easily apply all borders in Excel and make your report or spreadsheet look professional and organized. All you need to do is select the cells that you want to apply the borders to, select the type of border you’d like to use, and click the Borders button to apply the borders to your selection. With a few simple steps, you can make your Excel spreadsheets look clean and professional.
How to Apply Comma Style in Excel?
How to Apply a Theme to a Workbook in Excel?
Related Posts
Can Microsoft Forms Pull Data From Excel?
How to Get Power Bi Data Into Excel?

How to Print Labels From Excel in Word?

How to Link Excel to Word?

How to Paste Excel Table Into Word?
