
How to Turn Columns Into Rows in Excel?
Excel is a powerful program that can help you organize and analyze data. It has many features that allow you to manipulate your data in various ways. One of the most useful features is the ability to quickly and easily turn columns into rows. By doing this, you can easily compare data points and draw meaningful insights from your data. In this article, we’ll show you how to turn columns into rows in Excel and how to use this feature to your advantage. With this knowledge, you’ll be able to make the most of your data and get the most out of Excel.
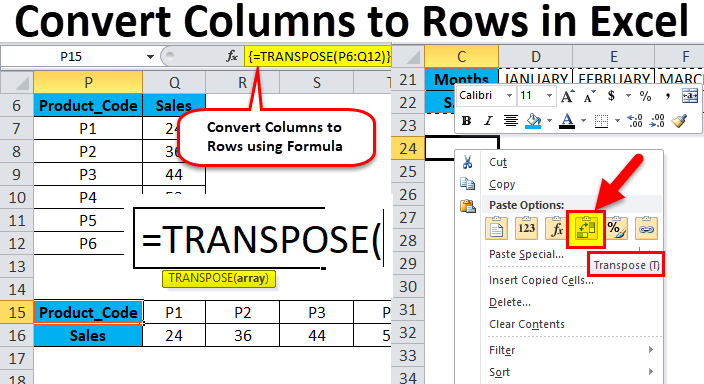
You can turn columns into rows in Excel using the ‘Transpose’ feature. Here’s how:
- Open the Excel worksheet you want to transpose.
- Select the cells that contain the data you want to switch.
- Copy the selected cells (Ctrl+C).
- Select the cell where you want the transposed data to appear.
- Right-click and select ‘Paste Special.’
- Select the checkbox next to ‘Transpose’ and click ‘OK’.

How to Transpose Columns into Rows in Excel?
Transposing data in Excel is a great way to quickly and easily reorganize your data. By transposing your data, you can turn columns into rows and rows into columns. This can be a great way to compare and analyze data. In this article, we will discuss how to transpose columns into rows in Excel.
Step 1: Select the Data You Want to Transpose
The first step in transposing your data is to select the data that you want to transpose. This can be as simple as highlighting the entire column or row of data that you want to transpose. You can also select only a portion of the data that you want to transpose.
Step 2: Copy the Data
Once you have selected the data that you want to transpose, the next step is to copy the data. To do this, you can either right-click on the highlighted data and select “Copy” or you can press the “Ctrl” and “C” keys on your keyboard.
Step 3: Select the Destination Cell
The next step is to select the destination cell where the transposed data will be placed. This can be any cell in the same sheet or in a different sheet. To select the destination cell, simply click on the cell or highlight the cell.
Step 4: Paste the Data
Once you have selected the destination cell, you can now paste the data. To do this, you can either right-click on the destination cell and select “Paste” or you can press the “Ctrl” and “V” keys on your keyboard.
Step 5: Use the Transpose Function
The final step in transposing your data is to use the transpose function. To do this, you will need to select the data you have just pasted and then click the “Data” tab in the ribbon. From there, click the “Transpose” button on the ribbon and the data will be transposed.
Tips for Transposing Data in Excel
1. Check Your Data Before Transposing
Before you transpose your data, it is important to check your data to make sure that it is accurate. This will help you avoid any mistakes or errors when you transpose your data.
2. Use a Different Sheet
If you want to keep the original data intact, it is best to use a different sheet when you transpose your data. This will ensure that the original data is not changed or modified.
3. Use a Separate Column for the Transposed Data
When you transpose your data, it is best to use a separate column for the transposed data. This will make it easier to differentiate the original data and the transposed data.
Related FAQ
What is the difference between columns and rows in Excel?
Columns and rows are two of the main components of an Excel sheet. Columns are the vertical sections of the sheet and are labeled alphabetically (A, B, C, etc.). Rows are the horizontal sections of the sheet and are labeled numerically (1, 2, 3, etc.). Each intersection of a column and a row is called a cell. Cells can hold text, numbers, formulas, and other data.
How do I turn columns into rows in Excel?
To turn columns into rows in Excel, you can use the Transpose function. To do this, first, select the range of data that you want to transpose. Then go to the Data tab and click on the Transpose option. This will convert the columns into rows, and rows into columns.
What are the benefits of turning columns into rows in Excel?
Turning columns into rows in Excel can be beneficial for a few reasons. First, it allows you to quickly and easily reorganize your data. For example, if you have a list of names in columns and you want to reorganize them into rows, the Transpose function can do this in a few clicks. It can also make it easier to compare or analyze data when it is all in rows. Lastly, it can make it easier to copy and paste data from one sheet to another.
Are there any limitations to using the Transpose function?
Yes, there are a few limitations to using the Transpose function. First, the data that you want to transpose must be in a contiguous range. This means that there should be no blank rows or columns in the selection. Second, you can only transpose the data once. After that, if you want to change it back, you will need to manually rearrange the data.
What if I need to transpose multiple ranges of data?
If you need to transpose multiple ranges of data, you can use the Power Query add-in. This add-in allows you to select multiple ranges of data and transpose them all at once. This can be a much faster and more efficient way to transpose multiple ranges of data.
Can I transpose data from external sources, such as CSV files?
Yes, you can transpose data from external sources, such as CSV files. To do this, first, open the file in Excel. Then use the Data tab, select the range of data that you want to transpose, and click on the Transpose option. This will convert the columns into rows, and rows into columns.
As you can see, learning how to turn columns into rows in Excel is not difficult. With a few simple steps and a bit of practice, you can quickly become proficient in this skill. Whether you need to rearrange data or compare two sets of information, turning columns into rows can be a great way to make your work easier and more efficient. So give it a try and start mastering this useful skill today!
How to Do Logarithms in Excel?
How to Remove Unused Cells in Excel?
Related Posts

Small businesses struggle with ERC tax credit submissions

10 Misunderstandings of the Employee Retention Credit

ERC Tax Credit 2023: Is the ERC tax credit still available?
