
How to Sign Into Microsoft Account on Nintendo Switch?
Are you a proud Nintendo Switch owner looking to take your gaming experience to the next level? If you’re a Microsoft user, you can now sign into your Microsoft account on your Switch to access special features, such as cloud storage and access to certain games. In this guide, we’ll walk you through the steps on how to sign into your Microsoft account on your Nintendo Switch. Let’s get started!
- Open the Nintendo Switch Home Menu and select the System Settings.
- Scroll down and select the “User” option.
- Select the “Add User” option.
- Choose “Sign In with a Nintendo Account” or “Sign in with a Microsoft Account”.
- Select “Sign in with a Microsoft Account”.
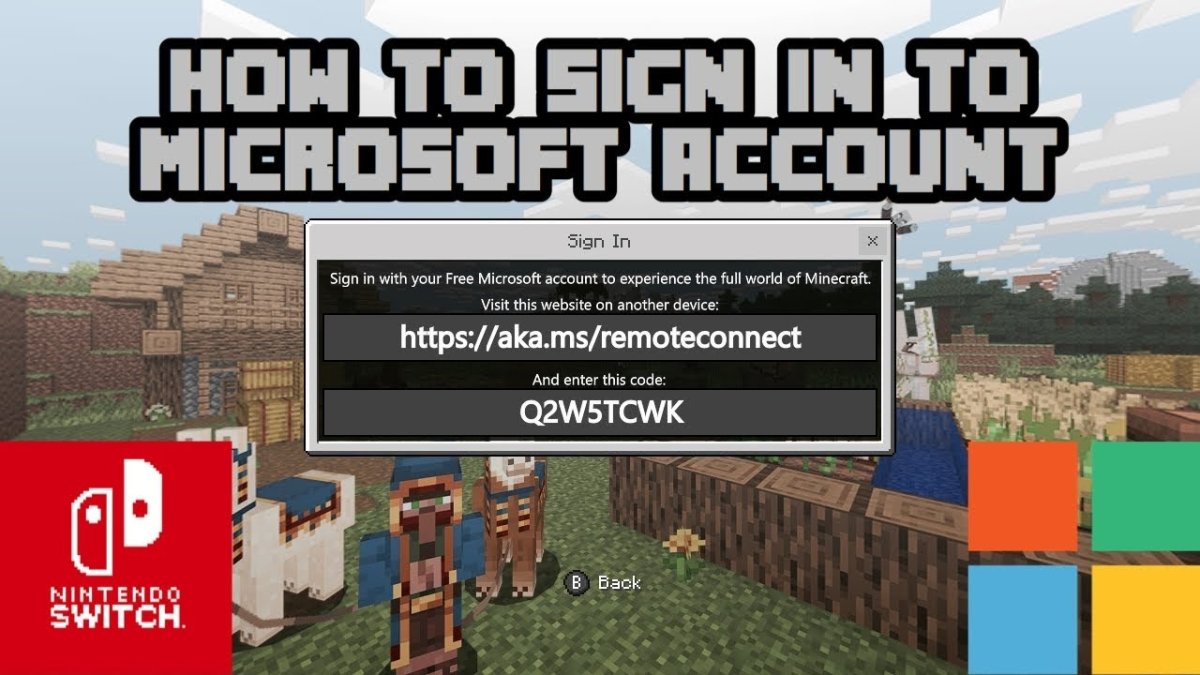
- Enter the Microsoft Account email address and password.
- Choose “Sign In”
- Select “Next”
- Select “Link Nintendo Account” and follow the prompts.
Signing Into Microsoft Account on Nintendo Switch
The Nintendo Switch has become one of the world’s most popular gaming consoles and it’s not surprising that many gamers are keen to link their Microsoft account with their Nintendo Switch. Doing so gives gamers access to a range of services on the console, including online play, access to the Nintendo eShop, and more. In this article, we’ll show you how to sign into a Microsoft account on your Nintendo Switch.
Step 1: Get Yourself a Microsoft Account
The first step is to create a Microsoft account if you don’t already have one. To do this, you will need to visit the Microsoft website and follow the instructions to create a new account. You will need to provide your name, email address, and a password before you can sign into your Microsoft account.
Once you have created an account, make sure to write down your username and password as you will need them to sign in to your Microsoft account on the Nintendo Switch.
Step 2: Sign in to Your Microsoft Account on the Nintendo Switch
To sign into your Microsoft account on the Nintendo Switch, open the System Settings menu and select the ‘Sign in with a Microsoft Account’ option. You will then be asked to enter your Microsoft account username and password.
Once you have entered the correct credentials, select the ‘Sign in’ button and you will be signed into your Microsoft account on the Nintendo Switch.
Step 3: Set Up Your Microsoft Account on the Nintendo Switch
Once you’ve signed in to your Microsoft account on the Nintendo Switch, you will be asked to set up your Microsoft account on the console. You will need to provide your name, email address, and a password before you can set up your account.
Once you’ve provided the required information, you will be asked to confirm your Microsoft account settings. Once you’ve done so, your Microsoft account will be fully set up on the Nintendo Switch.
Step 4: Connect Your Microsoft Account to the Nintendo eShop
Once you’ve set up your Microsoft account on the Nintendo Switch, you will need to connect it to the Nintendo eShop. To do this, open the Nintendo eShop and select the ‘Sign in with a Microsoft Account’ option. You will then be asked to enter your Microsoft account username and password.
Once you have entered the correct credentials, select the ‘Sign in’ button and you will be connected to the Nintendo eShop with your Microsoft account.
Step 5: Enjoy Your Microsoft Account on the Nintendo Switch
Once you’ve signed in to your Microsoft account on the Nintendo Switch and connected it to the Nintendo eShop, you will be ready to enjoy all the benefits that come with having a Microsoft account on the console.
You will now be able to access your Microsoft account on the Nintendo Switch and enjoy a range of services such as online play, access to the Nintendo eShop, and more.
Top 6 Frequently Asked Questions
What is a Microsoft Account?
A Microsoft Account is a single sign-in service that provides access to many Microsoft products and services such as Outlook, Skype, OneDrive, and Office. It allows you to use one username and password to access all of these services, as well as to purchase products and services from Microsoft. It also allows you to sync your data across multiple devices so you can access your data from any device.
How Do I Sign Into My Microsoft Account on Nintendo Switch?
To sign into your Microsoft account on the Nintendo Switch, you’ll need to first create a Nintendo Account. Once you have done so, you can then link your Nintendo Account to your Microsoft Account. To do so, open the Nintendo eShop on the Switch and select “Sign In”. Then choose “Link a Nintendo Account” and follow the on-screen instructions to sign in and link your Microsoft Account.
What Benefits Do I Get From Connecting My Nintendo Switch to My Microsoft Account?
By connecting your Nintendo Switch to your Microsoft Account, you will be able to access your Xbox Live profile and achievements, as well as take advantage of cross-play and cross-buy features with Xbox One and Windows 10 games. You will also be able to share screenshots and gameplay clips with your friends on Xbox Live.
What Information Is Needed to Sign Into My Microsoft Account on Nintendo Switch?
To sign into your Microsoft Account on the Nintendo Switch, you’ll need your Microsoft Account username and password. You may also be asked to enter a code that will be sent to your email address or mobile phone number associated with your Microsoft account.
What if I Have Forgotten My Microsoft Account Password?
If you have forgotten your Microsoft Account password, you can reset it by visiting the Microsoft Account website. On the sign-in page, select “I forgot my password” and follow the on-screen instructions to reset your password.
Can I Have Multiple Microsoft Accounts Linked to my Nintendo Switch?
Yes, you can have multiple Microsoft Accounts linked to your Nintendo Switch. To do so, open the Nintendo eShop on the Switch and select “Sign In”. Then choose “Link a Nintendo Account” and follow the on-screen instructions to sign in and link additional Microsoft Accounts.
Signing into your Microsoft account on Nintendo Switch is a straightforward process thanks to the intuitive user interface. After a few simple steps, you can access your Microsoft account on the Switch and start playing your favorite games. With the ability to store your games and data in one place, your Nintendo Switch gaming experience will be that much more enjoyable. So what are you waiting for? Get signed in and start playing!
How to Sign Into Your Microsoft Account on Xbox 360?
How to Sign Out From Microsoft Account in Windows 10?
Related Posts

Small businesses struggle with ERC tax credit submissions

10 Misunderstandings of the Employee Retention Credit

ERC Tax Credit 2023: Is the ERC tax credit still available?
