
How to Remove Shared Folder From Network Windows 10?
If you’re trying to remove a shared folder from your network in Windows 10, it can be a tricky process. Fortunately, with a few simple steps, you can easily remove a shared folder from your network. In this article, we will explain how to remove a shared folder from your network Windows 10. We will cover the different ways to do it, such as using the File Explorer, the Command Prompt, and the Network and Sharing Center. We will also provide troubleshooting tips to help you in case you encounter any issues. So, let’s get started and learn how to remove a shared folder from your network Windows 10.
Removing a Shared Folder From Network Windows 10:
- Open File Explorer and select the shared folder.
- Right-click on the folder and select Properties.
- Click the Sharing tab.
- Click Advanced Sharing.
- Click on the Stop Sharing button to remove the folder from the network.
- Click OK.

Removing a Shared Folder from a Network on Windows 10
In Windows 10, sharing a folder or a drive on the network is a simple process. However, if you want to remove a shared folder from the network, the process is slightly different. This article will explain how to remove a shared folder from a network on Windows 10.
Right-Click on the Folder to Remove
The first step to remove a shared folder from a network is to right-click on the folder that you want to remove. This will bring up a menu with a variety of options. Select the “Properties” option.
Navigate to the Sharing Tab
Once you have opened the folder’s Properties window, navigate to the “Sharing” tab. This tab will show you whether the folder is currently shared or not.
Click on the “Stop Sharing” Button
When you are on the Sharing tab, you will see a button labeled “Stop Sharing.” Click on this button to stop the sharing of the folder. After clicking the button, you will be asked to confirm the action. Click “Yes” to confirm the action and the folder will no longer be shared on the network.
Verify the Folder Has Been Removed
Once you have clicked the “Stop Sharing” button, you can verify that the folder has been removed from the network. To do this, open the Network window and check to see if the folder is still there. If the folder is not visible, then it has been successfully removed from the network.
Remove the Folder from the Network List
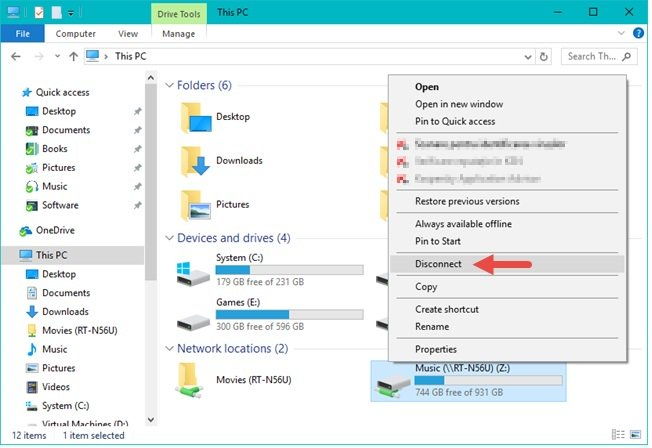
If you are still seeing the folder in the Network window, you can remove it manually by right-clicking on the folder and selecting the “Remove from Network List” option. This will completely remove the folder from the network and it will no longer be visible in the Network window.
Disable Network Discovery
Finally, if you want to ensure that the folder is no longer shared on the network, you can disable the Network Discovery feature. To do this, go to the Control Panel and select “Network and Sharing Center.” Then, click on “Change advanced sharing settings” and disable the “Network discovery” option. This will ensure that no other computers on the network can see the folder.
Frequently Asked Questions
Q1. How do I remove a shared folder from the network in Windows 10?
Answer: To remove a shared folder from the network in Windows 10, first open File Explorer. Navigate to the folder you want to remove, right-click on it and select Properties. In the Properties window, select the Sharing tab and click on the Advanced Sharing button. Make sure the Share this folder option is unchecked, and then click the Apply and then OK button to save the changes. Finally, right-click on the folder and select Stop Sharing to completely remove the folder from the network.
Q2. How do I remove a shared folder from the Network Neighborhood?
Answer: To remove a shared folder from the Network Neighborhood in Windows 10, open the Network and Sharing Center and select Advanced sharing settings. Disable the option to Turn on network discovery, then click the Save changes button. This will remove the shared folder from the Network Neighborhood.
Q3. How do I stop sharing a folder in Windows 10?
Answer: To stop sharing a folder in Windows 10, first open File Explorer and navigate to the folder you want to stop sharing. Right-click on the folder and select Properties. In the Properties window, select the Sharing tab and click on the Advanced Sharing button. Make sure the Share this folder option is unchecked, then click the Apply and then OK button to save the changes. Finally, right-click on the folder and select Stop Sharing to stop sharing the folder.
Q4. How do I remove a shared folder from my computer?
Answer: To remove a shared folder from your computer in Windows 10, first open File Explorer and navigate to the folder you want to remove. Right-click on the folder and select Properties. In the Properties window, select the Sharing tab and click on the Advanced Sharing button. Make sure the Share this folder option is unchecked, and then click the Apply and then OK button to save the changes. Finally, right-click on the folder and select Delete to remove the folder from your computer.
Q5. How do I remove a shared folder from my Network?
Answer: To remove a shared folder from your network in Windows 10, first open File Explorer. Navigate to the folder you want to remove, right-click on it and select Properties. In the Properties window, select the Sharing tab and click on the Advanced Sharing button. Make sure the Share this folder option is unchecked, and then click the Apply and then OK button to save the changes. Finally, right-click on the folder and select Stop Sharing to completely remove the folder from the network.
Q6. How do I remove a shared folder from the Public folder in Windows 10?
Answer: To remove a shared folder from the Public folder in Windows 10, open File Explorer and navigate to the Public folder. Right-click on the folder you want to remove, and select Properties. In the Properties window, select the Sharing tab and click on the Advanced Sharing button. Make sure the Share this folder option is unchecked, and then click the Apply and then OK button to save the changes. Finally, right-click on the folder and select Delete to completely remove the folder from the Public folder.
How to Remove Network Shared Folder and Drive in Windows 10
Removing a shared folder from your network in Windows 10 is a simple process that can be completed in a few steps. By following the steps outlined in this guide, you can easily and quickly remove a shared folder from your Windows 10 network. This is a great way to keep your network secure and organized. With the right knowledge, you can make sure that the files and folders shared on your network are always protected and secure.
How to Copy Files to Flash Drive Windows 10?
How to Cite a Powerpoint Apa?
Related Posts

Small businesses struggle with ERC tax credit submissions

10 Misunderstandings of the Employee Retention Credit

ERC Tax Credit 2023: Is the ERC tax credit still available?
