
How to Make Excel Cells Expand to Fit Text Automatically?
Do you ever find yourself working with data in Excel and wanting to make it easier to read? Ever wish that the cells would automatically expand to fit your text? Well, you’re in luck! In this article, we’ll be discussing how to make Excel cells expand to fit text automatically. With a few simple steps, you can make your Excel documents more organized and easier to read. So, if you’re looking for an easy way to make your data look great, let’s get started!
- Open the Excel worksheet.
- Select the cells you want to adjust.
- Right click and select Format Cells.
- In the Alignment tab, select “Wrap text”.
- Click OK.
The selected cells will now automatically expand to fit the text entered.

How to Automatically Make Excel Cells Expand to Fit Text
Adjusting the column widths of Microsoft Excel spreadsheets manually can be a tedious process, but there is a way to make the cells expand automatically to fit your text. This feature can save you time and effort, and it can also make it easier to keep your data organized.
Most versions of Microsoft Excel offer an “AutoFit Column Width” feature that can automatically adjust a column to fit the longest piece of text in a cell. This feature will adjust the column size so that the text fits without wrapping or spilling over into multiple cells.
Step 1: Select the Column
The first step to using the AutoFit Column Width feature is to select the column that you want to adjust. You can do this by clicking on the column header, which is the letter at the top of the column. You can also select multiple columns by holding down the “Shift” key and selecting the columns that you want to adjust.
Step 2: Access the AutoFit Column Width Feature
Once you have selected the columns that you want to adjust, you can access the AutoFit Column Width feature by right-clicking on the selection and clicking on the “AutoFit Column Width” option. This will immediately adjust the columns to fit the longest piece of text in each cell.
How to Automatically Wrap Text in Excel Cells
In addition to adjusting column widths, you can also automatically wrap text in Excel cells. This feature can be useful if you have a lot of text in a cell and you don’t want the text to spill over into multiple cells. By wrapping the text, you can keep the cell organized and make it easier to read.
Step 1: Select the Cell
The first step to wrapping text in an Excel cell is to select the cell that you want to adjust. You can do this by clicking on the cell or by using the arrow keys to move the cursor to the cell.
Step 2: Access the Wrap Text Feature
Once you have selected the cell, you can access the Wrap Text feature by right-clicking on the selection and clicking on the “Wrap Text” option. This will immediately wrap the text in the cell so that it fits without spilling over into multiple cells.
How to Use the Merge and Center Feature
The Merge and Center feature in Excel can be used to merge multiple cells into one. This feature can be useful if you want to combine multiple pieces of data into one cell, or if you want to create a header for a column or row.
Step 1: Select the Cells
The first step to using the Merge and Center feature is to select the cells that you want to merge. You can do this by clicking on the cells or by using the arrow keys to select a range of cells.
Step 2: Access the Merge and Center Feature
Once you have selected the cells that you want to merge, you can access the Merge and Center feature by right-clicking on the selection and clicking on the “Merge and Center” option. This will immediately merge the selected cells into one and center the text in the new cell.
Frequently Asked Questions
Q1. What is the default behavior of Excel Cells?
The default behavior of Excel cells is that they will not expand to fit text automatically. By default, the cells will remain at a fixed size and any text that is too long to fit in the cell will be truncated.
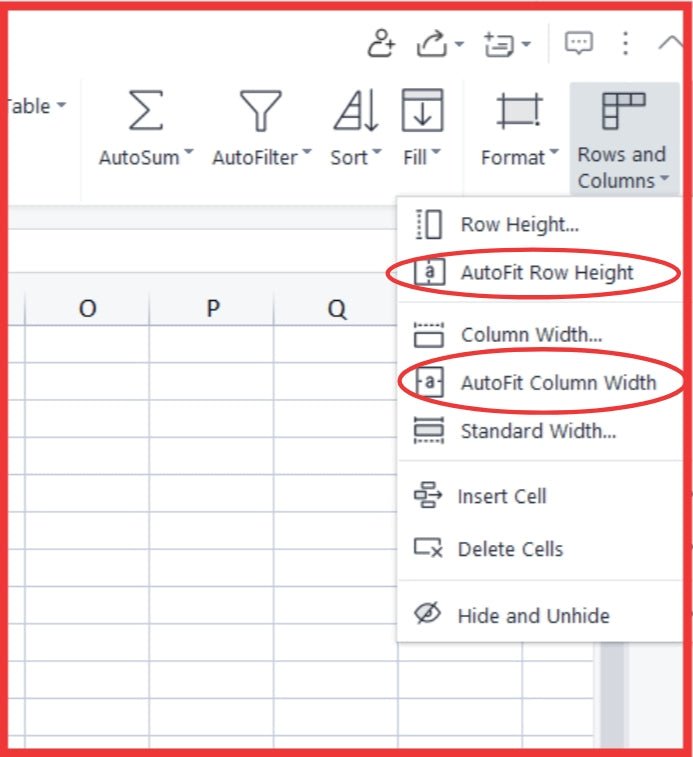
Q2. How can I make Excel Cells expand to fit text automatically?
In order to make Excel cells expand to fit text automatically, you will need to adjust the column width or row height. To do this, select the cell or range of cells you want to adjust, then go to the Home tab and select Format > AutoFit Column Width or AutoFit Row Height. This will cause the cells to automatically adjust their size based on the text inside them.
Q3. What if I have a lot of cells to adjust?
If you have a large number of cells to adjust, you can select the entire range and then use the same AutoFit feature. This will cause the cells to automatically adjust their size based on the text inside them, and will save you time from having to adjust each cell individually.
Q4. Is there any other way to adjust the size of cells?
Yes, you can also adjust the size of cells manually by selecting the cell or range of cells you want to adjust, then going to the Home tab and selecting Format > Column Width or Row Height. You can then enter a specific size for the cell or range of cells, and the cells will adjust to that size.
Q5. Are there any other settings I can adjust?
Yes, there are several other settings you can adjust to customize the behavior of the cells. For example, you can choose to wrap text inside the cell, or adjust the text alignment. You can also adjust the cell padding, which controls how much space there is between the text and the edge of the cell.
Q6. Is there any way to have the cells adjust their size automatically when new text is added?
Yes, you can enable the AutoFit feature to have the cells automatically adjust their size when new text is added. To do this, select the cell or range of cells you want to adjust, then go to the Home tab and select Format > AutoFit Column Width or AutoFit Row Height. This will cause the cells to automatically adjust their size based on the text inside them.
How to make excel cells expand with text
In conclusion, making excel cells expand to fit text automatically is a great way to make sure that all the data you enter into your spreadsheet is properly visible. With a few simple steps, you can easily make sure that your data is readable and organized. With this, you can make sure that your data is readily available and accessible, without having to manually adjust the size of the cells every time you add new information.
How to Create Ftp Server in Windows 11?
How to Recover Unsaved Excel Files?
Related Posts

Small businesses struggle with ERC tax credit submissions

10 Misunderstandings of the Employee Retention Credit

ERC Tax Credit 2023: Is the ERC tax credit still available?
