Where Are Screenshots Saved Windows 10?
Are you a Windows 10 user who wants to know how to take screenshots? Have you ever wondered where the screenshots are saved on your computer? If yes, then this article is for you! Here, we will discuss the process of taking screenshots in Windows 10 and where they are saved on your computer. So, let's get started!
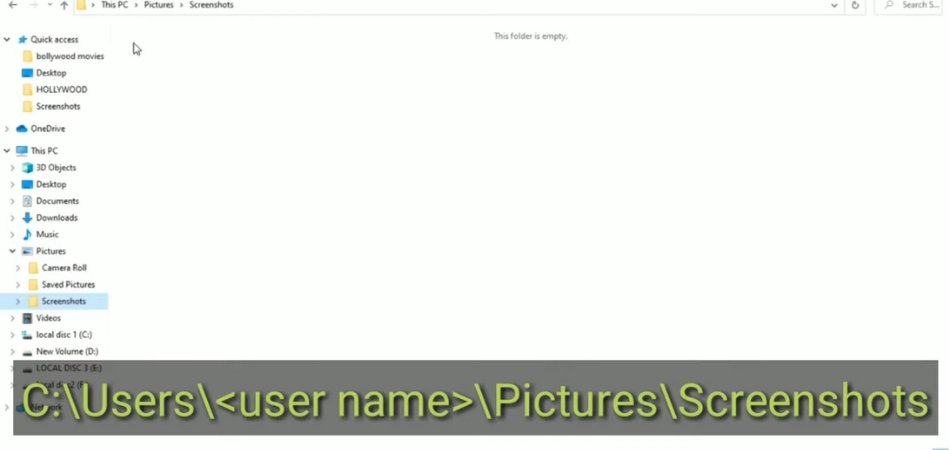
By default, screenshots taken in Windows 10 are stored in the Pictures\Screenshots folder. To take a screenshot, press the Windows logo key + PrtScn. The screen will be saved to the Pictures\Screenshots folder as a PNG file. The file name will start with Screenshot (number).
Where Do Screenshots Get Saved in Windows 10?
Taking a screenshot on Windows 10 is a quick and easy way to capture what’s on your screen. But where do those screenshots go? By default, Windows 10 saves screenshots to the Pictures folder in a subfolder called Screenshots. However, you can customize where your screenshots are saved by changing the default save location in your computer’s settings.

When you take a screenshot on Windows 10, the image is automatically saved as a PNG file in the Screenshots folder. This folder is located in the Pictures library, which can be accessed from the left-hand panel in File Explorer. You can also access the Screenshots folder by typing “Screenshots” into the search bar in the taskbar.
If you’d like to change the default save location for screenshots on Windows 10, you can do so by going to Settings > Ease of Access > Keyboard. Under the “Print Screen shortcut” section, click the “Use the PrtScn button to open screen snipping” dropdown menu and select “Open an existing picture.” Then, click the “Browse” button and select the folder you’d like to use as the default save location for your screenshots.
How to Take a Screenshot in Windows 10?
There are several ways to take a screenshot in Windows 10. The simplest method is to press the “PrtScn” or “Print Screen” key on your keyboard. This will take a screenshot of your entire screen and save it to the “Screenshots” folder in the Pictures library.
Another way to take a screenshot is to press the “Windows” key + “Shift” + “S”. This will open a small window that will allow you to select the area of the screen that you’d like to capture. Once you’ve selected the area, the screenshot will be saved to the “Screenshots” folder in the Pictures library.
You can also take a screenshot by using the “Snipping Tool”. To open this tool, type “Snipping Tool” into the search bar in the taskbar and select the tool from the search results. Once the tool is open, you can select the area of the screen that you’d like to capture and save it as an image file.
How to Access Screenshots on Windows 10?
Once you’ve taken a screenshot on Windows 10, you can access it from the “Screenshots” folder in the Pictures library. To access this folder, you can open File Explorer and select the “Pictures” library from the left-hand panel.
Then, select the “Screenshots” folder to view all of your screenshots. Alternatively, you can access your screenshots by typing “Screenshots” into the search bar in the taskbar. This will open the “Screenshots” folder, where you can view and manage your screenshots.
How to Share Screenshots on Windows 10?
Sharing screenshots on Windows 10 is a quick and easy way to share what’s on your screen with friends and family. To share a screenshot, right-click on the screenshot in the “Screenshots” folder and select the “Share” option. This will open the Share window, where you can select the app or service that you’d like to use to share the screenshot.
You can also share screenshots directly from the “Snipping Tool.” To do this, open the “Snipping Tool” and select the screenshot you’d like to share. Then, click the “Share” button at the top of the window and select the app or service that you’d like to use to share the screenshot.
How to Edit Screenshots on Windows 10?
Editing screenshots on Windows 10 is a great way to customize your screenshots before sharing them with others. To edit a screenshot, open the “Snipping Tool” and select the screenshot you’d like to edit. Then, click the “Edit” button at the top of the window and select the app or service that you’d like to use to edit the screenshot.
Alternatively, you can use the built-in photo editor in Windows 10 to edit your screenshots. To do this, open the “Photos” app and select the screenshot you’d like to edit. Then, click the “Edit & Create” button at the top of the window and select the editing option that you’d like to use to customize your screenshot.
Related FAQ
Q1. What is a screenshot?
A screenshot is an image taken of whatever is on a user's computer screen. It is often used to illustrate a particular problem or issue that a user is having, or to provide a visual explanation of something. Screenshots can also be used to capture a moment in a game, or to quickly share something with someone else.
Q2. How do I take a screenshot on Windows 10?
Taking a screenshot on Windows 10 is easy. The simplest way is to use the Print Screen (PrtSc) key on your keyboard. Press the PrtSc key and the screenshot will be saved to the clipboard. You can then paste the screenshot into an image editor (such as Paint) and save it as an image file.
Q3. Where are screenshots saved by default on Windows 10?
By default, screenshots taken on Windows 10 are saved in a folder called Screenshots, which is located in the Pictures folder. The screenshot will be saved as a PNG file. To find the Screenshots folder, you can open the File Explorer and navigate to the Pictures folder.
Q4. Can I change where screenshots are saved on Windows 10?
Yes, you can change where screenshots are saved on Windows 10. To do this, open the Settings app and navigate to the System category. Select the “Screenshots” option and then choose the folder where you would like the screenshots to be saved.
Q5. What file format are screenshots saved as on Windows 10?
By default, screenshots taken on Windows 10 are saved in the PNG file format. This is a widely-used file format for images, and it is compatible with most image editors and web browsers.
Q6. Can I change the file format of screenshots taken on Windows 10?
Yes, you can change the file format of screenshots taken on Windows 10. To do this, open the Settings app and navigate to the System category. Select the “Screenshots” option and then choose the file format that you would like the screenshots to be saved as.
Conclusion
Windows 10 has made it easier than ever to quickly and easily take screenshots and save them in an easily accessible folder. Pressing the Windows + PrtScn keys will capture the entire screen and save it to the "Pictures > Screenshots" folder.
Users can also use the Snipping Tool to take screenshots of specific areas of their screen, or they can even use the Game Bar to take a screenshot while playing a game. No matter what you need your screenshots for, Windows 10 has you covered.
Where Are Minecraft Worlds Saved Windows 10?
How to Boot From USB Windows 11?
Related Posts

How to Move the Taskbar on Windows 11

How to Set Up a Microphone on Windows 10?
How to Set Reminders on Windows 10?
How To Rip Cds In Windows 10?
How To Repair Windows 10 From USB 2?
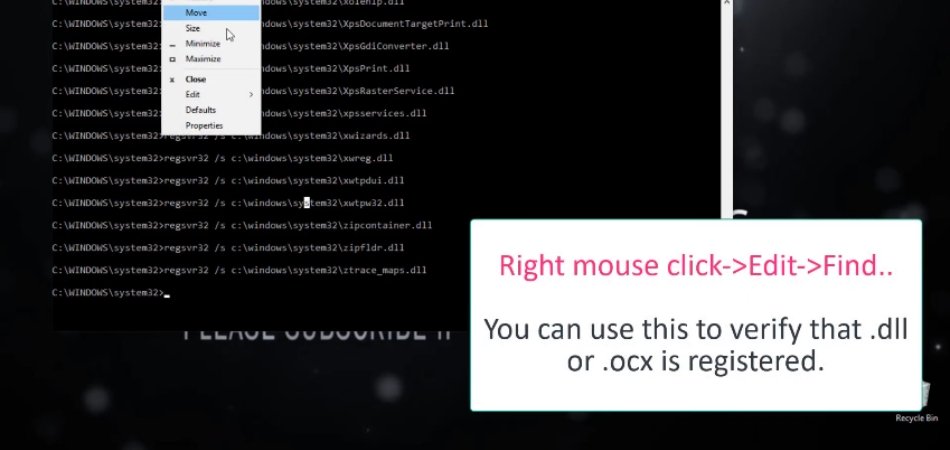
How to Register Dll in Windows 10?
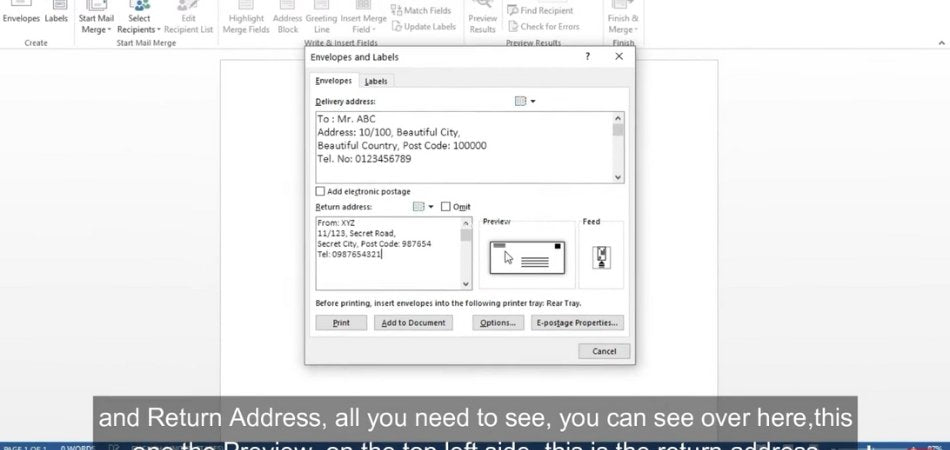
How to Print Envelopes in Windows 10?