
How to Take a Partial Screenshot on Windows 10?
If you’re having difficulty capturing the whole screen on your Windows 10 computer, then you’re in the right place. Taking a partial screenshot is a helpful and easy way to quickly capture a specific area of your screen. In this article, you will learn how to take a partial screenshot on Windows 10 with ease. So let’s get started!
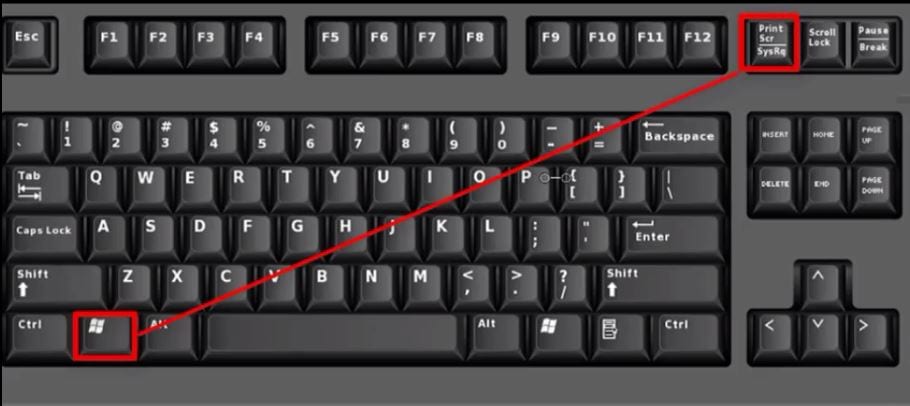
- Press the
+ keys simultaneously to capture a part of the screen.+ - The screen will dim, drag the cursor to select the area you want to capture.
- The captured image will be copied to the clipboard.
- Open an image editor or Microsoft Word to paste the image.
Alternatively, you can open the Snipping Tool from the Start menu. Select the type of snip you want to make and then select the area of the screen you want to capture. The screenshot will be opened in the Snipping Tool window. From here you can save it, copy it, or share it.

Taking a Partial Screenshot on Windows 10
Taking a screenshot is a great way to capture the information that’s currently on your computer’s screen. On Windows 10, you can take a partial screenshot by using the Snipping Tool or the Print Screen button. In this article, we’ll look at how you can use these methods to take partial screenshots on your Windows 10 device.
Using the Snipping Tool
The Snipping Tool is a built-in application on Windows 10 that enables you to take screenshots of a certain area or the entire screen. To use the Snipping Tool, click on the Start button and type in “Snipping Tool”. Once the Snipping Tool window opens, click on the New button to start the process of taking a screenshot.
Once you’ve clicked on the New button, your cursor will change to a crosshair. You can then select the area of the screen that you want to capture. When you’ve selected the area, the screenshot will be taken and the Snipping Tool window will open with the screenshot in it. You can then save the screenshot on your computer.
Using the Print Screen Button
Another way to take a partial screenshot on Windows 10 is to use the Print Screen button. The Print Screen button is usually located on the top row of your keyboard. When you press the Print Screen button, the entire screen will be captured and stored in your computer’s clipboard.
Once the screenshot is stored in the clipboard, you can paste it into any image editing software such as Paint or Photoshop. From there, you can crop the image to the desired area and save it on your computer.
Other Tools for Taking Partial Screenshots
If you don’t want to use the Snipping Tool or the Print Screen button, there are other tools that you can use to take partial screenshots on Windows 10. There are many third-party applications that enable you to take partial screenshots on Windows 10.
One such application is Lightshot. Lightshot is an easy-to-use application that enables you to take partial screenshots quickly and easily. It also provides you with a range of editing options such as cropping, resizing, and adding text to the screenshot.
Conclusion
Taking a partial screenshot on Windows 10 is a great way to capture the information that’s currently on your screen. You can use the Snipping Tool or the Print Screen button to take partial screenshots on Windows 10. There are also a range of third-party applications available that you can use to take partial screenshots.
Frequently Asked Questions
Q. What is a Partial Screenshot?
A. A partial screenshot is when you take a screenshot of a specific part of your screen instead of capturing the entire screen. It’s useful when you only need to capture a small portion of the screen to show or share. It can be done on Windows 10 using the Snip & Sketch tool.
Q. How Do I Access Snip & Sketch?
A. Snip & Sketch is a built-in Windows 10 app that can be used to take screenshots. It can be accessed by searching for “Snip & Sketch” in the Windows 10 search bar. Alternatively, you can type “snipping tool” in the search bar, which will open the legacy version of the app.
Q. How Do I Take a Partial Screenshot?
A. To take a partial screenshot, open the Snip & Sketch app and click on the “New” button. Your screen will dim and your mouse cursor will change. Click and drag the cursor to select the area of the screen you want to capture. Once you have selected the area, you can either save the screenshot or copy it to the clipboard.
Q. What Other Options Does Snip & Sketch Offer?
A. Snip & Sketch offers a few other options for taking screenshots. You can select the “Delay” option to add a few seconds delay before the screenshot is taken. This is useful when you need to open a menu or any other element before the screenshot is taken. Additionally, you can also select the “Free-Form” or “Rectangular” options to take a screenshot of a specific shape.
Q. What Are the Shortcut Keys for Taking a Partial Screenshot?
A. To quickly take a partial screenshot, you can use the shortcut key combination of “Windows logo key + Shift + S”. This will open the Snip & Sketch app and allow you to select the area you want to capture. Once you’ve selected the area, you can either save the screenshot or copy it to the clipboard.
Q. How Do I Share a Screenshot?
A. After taking a screenshot, you can share it in a few different ways. You can save the screenshot to a folder on your computer and attach it to an email or other program. You can also copy the screenshot to the clipboard and paste it into a document or image editing program. Finally, you can also use the built-in sharing options in the Snip & Sketch app to quickly share your screenshot to a variety of services.
Shortcut Key to Take Selected Area Screenshots in Windows-2020
Taking a partial screenshot on Windows 10 is easy and can save you time and energy when you need to capture a specific part of your screen. With the Snipping Tool, you can quickly capture the image you need and edit it as necessary, making it easy to save and share your screenshot. Taking partial screenshots can be a great way to capture information quickly and accurately, so why not give it a try today?
How to Disable File Sharing Windows 10?
How to Do a Voiceover on Powerpoint?
Related Posts

Small businesses struggle with ERC tax credit submissions

10 Misunderstandings of the Employee Retention Credit

ERC Tax Credit 2023: Is the ERC tax credit still available?
