
How to Make Gridlines Print in Excel?
Are you trying to create a spreadsheet in Excel and are having difficulty making sure the gridlines are printed out? Gridlines are incredibly important to help make sure your data is organized, and without them, your spreadsheet may look messy or disorganized. Fortunately, it’s easy to make sure your gridlines appear when you print out your spreadsheet. In this article, we’ll show you how to make gridlines print in Excel.
- Open the spreadsheet you want to print.
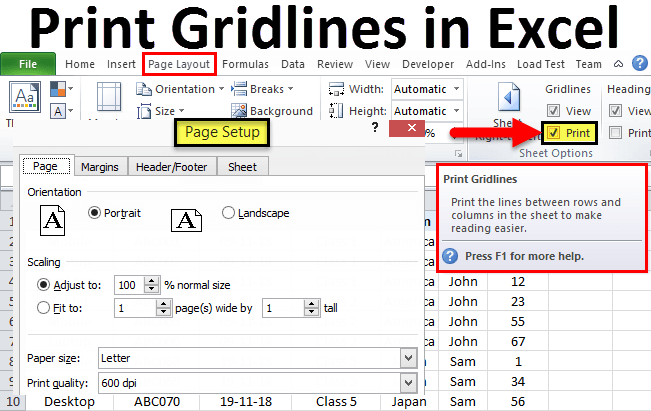
- Select the Page Layout tab.
- Under Page Setup, select Print Gridlines.
- In the Print window, select Print.

How to Print Gridlines in Excel
Gridlines are a great way to visually separate data in a worksheet, and they can be printed in Excel to help readers better understand the data. This tutorial will walk you through the steps needed to print gridlines in Excel, including how to view them on the screen and how to print them.
Display Gridlines on the Worksheet
Before you can print gridlines in Excel, you must first make sure they are visible on the worksheet. To do this, click the “View” tab and select the “Gridlines” checkbox in the “Show” section. This will cause the gridlines to be displayed on the worksheet, making it easier for you to see where the data is located.
Print Gridlines
Once you’ve made sure that the gridlines are visible on the worksheet, you can print them by clicking the “File” tab and selecting the “Print” option. On the Print window, make sure the “Print Gridlines” option is checked and then click “Print” to print the gridlines.
Exclude Gridlines from a Printout
If you don’t want to print the gridlines on a particular printout, you can exclude them by going to the Print window and unchecking the “Print Gridlines” option. This will prevent the gridlines from being printed on the worksheet.
Change Gridline Color
In addition to printing gridlines, you can also change their color to make them more visible. To do this, click the “Page Layout” tab and select the “Gridlines” option in the “Page Setup” section. This will open the Gridlines window, where you can select a different color for the gridlines.
Hide Gridlines
If you want to hide the gridlines so that they are not visible on the worksheet, you can do so by clicking the “View” tab and unchecking the “Gridlines” checkbox in the “Show” section. This will cause the gridlines to be hidden and they will not be printed on the worksheet.
Print Gridlines on Every Page
If you want to print the gridlines on every page of the worksheet, you can do so by going to the Print window and checking the “Print Gridlines on Every Page” option. This will cause the gridlines to be printed on every page of the worksheet.
Print Gridlines on Selected Pages
If you want to print the gridlines on only certain pages of the worksheet, you can do so by going to the Print window and checking the “Print Gridlines on Selected Pages” option. This will open the Print Gridlines on Selected Pages window, where you can select which pages you want the gridlines to be printed on.
Related FAQ
Question 1: What are Gridlines?
Answer: Gridlines are the dotted/dashed/solid lines that appear between the rows and columns in an Excel worksheet. They are used to help visually organize and separate the data in the worksheet into distinct sections. Gridlines can also help make it easier to identify the different cells and the data they contain.
Question 2: How do I Print Gridlines in Excel?
Answer: To print gridlines in Excel, you need to go to the Page Layout tab in the ribbon. Then, click the “Print Gridlines” option under the Sheet Options section. This will add gridlines to the worksheet and make them visible when you print.
Question 3: What Happens if Gridlines Don’t Show Up When I Print?
Answer: If the gridlines don’t show up when you print, then you may need to make sure that the “Print Gridlines” option is checked in the Page Layout tab. If it is checked and the gridlines still don’t show up, then you may need to check your printer settings or make sure that the paper size you are using is compatible with the size of the worksheet.
Question 4: How do I Change the Color of the Gridlines?
Answer: To change the color of the gridlines, you need to go to the Page Layout tab in the ribbon. Then, click on the “Page Setup” option under the Sheet Options section. In the Page Setup window, select the “Sheet” tab and then click on the “Gridline Color” option. You can then choose a color from the dropdown menu.
Question 5: How do I Turn Off Gridlines?
Answer: To turn off gridlines in Excel, you need to go to the Page Layout tab in the ribbon. Then, click the “Print Gridlines” option under the Sheet Options section. This will turn off the gridlines and make them not visible when you print.
Question 6: Are Gridlines Necessary?
Answer: Gridlines are not necessary for Excel worksheets, but they can be helpful for making the data in the worksheet easier to read and understand. They can also help with organizing the data into distinct sections and making it easy to identify different cells and the data they contain.
Printing in Excel 1 – Print the Gridlines when an Excel Spreadsheet is Printed
Whether you need to print a worksheet or just a portion of it, gridlines can help you better visualize the information. With a few simple steps, you can print gridlines in Excel. First, select the cells you want to print. Then, select the Page Layout tab and click the Print Titles button. Finally, select the Gridlines checkbox to print the lines. With these quick steps, you can easily make gridlines print in Excel.
Related Posts

Small businesses struggle with ERC tax credit submissions

10 Misunderstandings of the Employee Retention Credit

ERC Tax Credit 2023: Is the ERC tax credit still available?
