
How to Add Border in Powerpoint?
Are you looking for an easy way to make your Powerpoint presentation stand out? Adding borders to your slides can be a great way to give your presentation a professional and polished look. In this article, we’ll take a look at how to add borders to your Powerpoint slides in just a few simple steps. So, if you’re ready to give your presentation an eye-catching boost, keep reading to learn how to add borders in Powerpoint!
Adding a border to your Powerpoint slides is a simple process. First, select the slide you want to add a border to. In the ‘Design’ tab, click on the ‘Page Borders’ button. In the ‘Page Borders’ window, select the border type, color, and size that you want. Finally, click ‘OK’ to apply the border to your slide.
- Select the slide you want to add a border to
- Click on the ‘Page Borders’ button in the ‘Design’ tab
- Choose the border type, color, and size
- Click ‘OK’ to apply the border to your slide

How to Add a Border to a PowerPoint Presentation
Adding a border to your PowerPoint presentation can make it look more professional and eye-catching. It can also help to emphasize certain slides or sections. Fortunately, PowerPoint makes it easy to add a border with a few simple steps.
The first step is to select the slide or slides that you wish to add a border to. This can be done by clicking on the slide in the slide thumbnails. Once you have selected the slide or slides, you can click on the Format tab in the top ribbon. This will open up the Format menu.
In the Format menu, select the Slide Border option. This will open the Slide Border dialog box. Here, you will be able to select the type of border you want to use. There are several options available such as solid lines, dotted lines, and arrows. You can also choose the color and thickness of the border. Once you have made your selection, click on the Apply button to apply the border to your slide or slides.
Adding a Border to a Group of Slides
If you want to add a border to a group of slides, you can do this by selecting the group of slides in the slide thumbnails. Once you have selected the slides, you can follow the same steps as above to add the border. However, instead of clicking on the Apply button, you will click on the Apply To All button. This will apply the border to all of the selected slides.
Adding a Border to a Section of Slides
If you want to add a border to a section of slides, you can do this by selecting the section in the slide thumbnails. Once you have selected the section, you can follow the same steps as above to add the border. However, instead of clicking on the Apply button, you will click on the Apply To Section button. This will apply the border to all of the selected slides in the section.
Adding a Border to an Individual Slide
If you want to add a border to an individual slide, you can do this by selecting the slide in the slide thumbnails. Once you have selected the slide, you can follow the same steps as above to add the border. However, instead of clicking on the Apply button, you will click on the Apply To Selected button. This will apply the border to only the selected slide.
Editing a Border
If you need to edit an existing border, you can do this by selecting the slide or slides with the border. Once you have selected the slide or slides, you can click on the Format tab in the top ribbon. This will open up the Format menu. In the Format menu, select the Slide Border option. This will open the Slide Border dialog box. Here, you can make any changes to the existing border. Once you have made your changes, click on the Apply button to apply the changes.
Removing a Border
If you need to remove an existing border, you can do this by selecting the slide or slides with the border. Once you have selected the slide or slides, you can click on the Format tab in the top ribbon. This will open up the Format menu. In the Format menu, select the Slide Border option. This will open the Slide Border dialog box. Here, you can select the No Border option and click on the Apply button to remove the border.
Top 6 Frequently Asked Questions
1. How do I add a border to a slide in PowerPoint?
To add a border to a slide in PowerPoint, go to the Design tab then click on the Page Borders icon. In the Page Borders window, you can select the type of border you want to add, including line, art, or a custom border. You can also adjust the width and color of the border, as well as the style, color, and position of the border’s elements. Once you have the border set to your liking, click on the Apply button to add the border to the slide.
2. How do I add a border to an image in PowerPoint?
To add a border to an image in PowerPoint, select the image on the slide and go to the Format tab. Click on the Picture Border icon and in the Picture Border window, you can select the type of border you want to add, including line, art, or a custom border. You can also adjust the width and color of the border, as well as the style, color, and position of the border’s elements. Once you have the border set to your liking, click on the Apply button to add the border to the image.
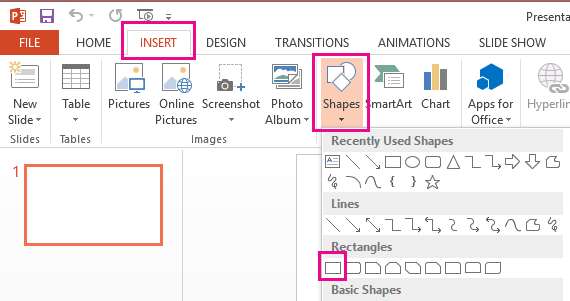
3. How do I add a border to a shape in PowerPoint?
To add a border to a shape in PowerPoint, select the shape on the slide and go to the Format tab. Click on the Shape Outline icon and in the Shape Outline window, you can select the type of border you want to add, including line, art, or a custom border. You can also adjust the width and color of the border, as well as the style, color, and position of the border’s elements. Once you have the border set to your liking, click on the Apply button to add the border to the shape.
4. How do I add a border to multiple objects in PowerPoint?
To add a border to multiple objects in PowerPoint, select the objects on the slide and go to the Format tab. Click on the Shape Outline icon and in the Shape Outline window, you can select the type of border you want to add, including line, art, or a custom border. You can also adjust the width and color of the border, as well as the style, color, and position of the border’s elements. Once you have the border set to your liking, click on the Apply button to add the border to all of the selected objects.
5. How can I change the color of a border in PowerPoint?
To change the color of a border in PowerPoint, go to the Design tab then click on the Page Borders icon. In the Page Borders window, you can select the color of the border from the drop-down menu. You can also adjust the width and color of the border, as well as the style, color, and position of the border’s elements. Once you have the border set to your liking, click on the Apply button to add the border to the slide.
6. How do I remove a border in PowerPoint?
To remove a border in PowerPoint, select the object with the border on the slide and go to the Format tab. Click on the Page Borders icon and in the Page Borders window, you can select the “No Border” option. Once you have selected the “No Border” option, click on the Apply button to remove the border from the slide.
How to add border in PowerPoint
Adding a border to your PowerPoint presentation is a great way to draw attention to your slides and make them stand out. With the right tools, you can easily add a creative and professional-looking border to your slides. By following the steps outlined in this article, you can quickly and easily add a border to any slide in your PowerPoint presentation.
How to Upload Powerpoint to Google Slides?
How to Forward Ports Windows 10?
Related Posts

Small businesses struggle with ERC tax credit submissions

10 Misunderstandings of the Employee Retention Credit

ERC Tax Credit 2023: Is the ERC tax credit still available?
