
How to Take a Xbox Apart?
Are you interested in taking a DIY approach to fixing your Xbox? If so, you’re in luck! In this article, we’re going to show you how to take apart an Xbox step-by-step so that you can diagnose and repair any issues with the console. Not only will you be able to save money, but you’ll also gain the satisfaction of having solved the problem yourself. So let’s get started!
- Power down the device and unplug all power cords from the Xbox.
- Remove the case screws from the back of the console using a Phillips head screwdriver.
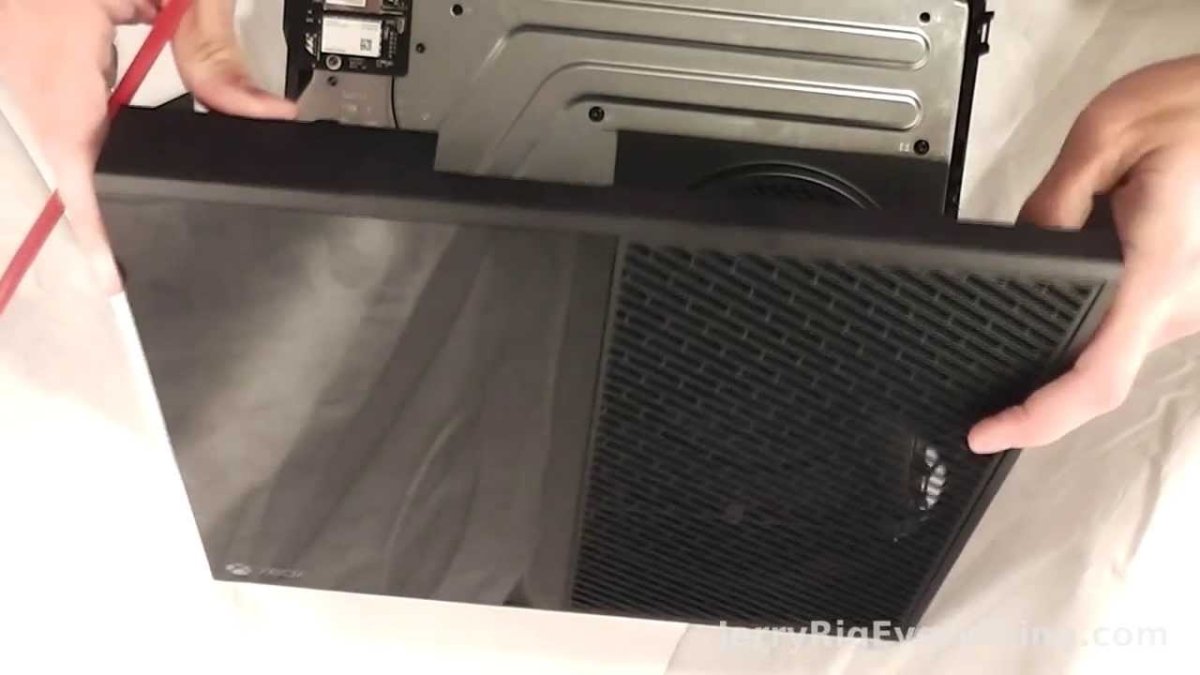
- Gently lift the case off of the console and set aside.
- Unplug the DVD drive cable from the motherboard and remove the drive.
- Remove the hard drive by unscrewing the two screws located on the right side of the console.
- Unplug the power cable and the data cable from the motherboard.
- Remove the motherboard screws and gently lift the motherboard out of the console.
Once the components have been removed, the console should be completely disassembled. Reassemble the components in reverse order to put the console back together.

How to Prepare for Taking a Xbox Apart
Taking apart a Xbox can be a daunting task, but with the right preparation it can be a relatively simple process. The first step is to gather the right tools. You will need a Phillips screwdriver, a flathead screwdriver, a set of tweezers, and a small set of pliers. It is also a good idea to have a container to hold the screws and other small parts that will be removed. Once you have all the necessary tools, you can begin the process of taking apart your Xbox.
The second step is to make sure that the Xbox is unplugged from the power source. This will help to prevent any potential electrical shock. Once the Xbox is unplugged, it is time to remove the screws from the outside of the console. These screws are typically located on the back, sides, and top of the console. Carefully remove each screw, being sure to keep track of where each one was located.
The third step is to begin removing the outer casing of the console. This can be done by gently prying the casing off with a flathead screwdriver. Once the casing is removed, you will be able to access the internal components of the console. It is important to take your time during this part of the process, as it is easy to damage the components if not done correctly.
Removing Components from the Xbox
Once you have removed the outer casing, you can then begin to remove the components from the inside of the console. This can be done by carefully unscrewing each component and removing it. Be sure to keep track of where each component was located, as some components can be difficult to reassemble. Additionally, be sure to wear gloves as some components may contain harmful chemicals.
The first component to remove is the motherboard. This is typically located on the bottom of the console. Once the motherboard has been removed, the hard drive and optical drive can be taken out. These components are typically located on the top of the console. Be sure to handle these components with care, as they can be easily damaged.
The next component to remove is the cooling fan. This is typically located on the side of the console. Carefully unscrew the fan, being sure to keep track of where the screws were located. Once the fan has been removed, the power supply can be taken out. This is typically located on the back of the console. Carefully unscrew the power supply and remove it from the console.
Reassembling the Xbox
Once all the components have been removed from the console, it is time to begin reassembling the Xbox. The first step is to reattach the motherboard. This can be done by carefully lining up the pins on the motherboard and the holes in the console. Once the motherboard is in place, the hard drive and optical drive can be reattached. These components are typically located on the top of the console.
The next step is to reattach the power supply. This is typically located on the back of the console. Carefully line up the pins and screws, and then reattach the power supply. Once the power supply is in place, the cooling fan can be reattached. This is typically located on the side of the console. Carefully line up the screws and then reattach the fan.
The final step is to reattach the outer casing of the console. This can be done by carefully lining up the edges of the casing and reattaching the screws. Once all the screws have been reattached, the console is ready to be plugged back in and used.
Cleaning the Xbox
Before reassembling the Xbox, it is important to give it a thorough cleaning. This can be done by using a damp cloth and a mild detergent. Be sure to avoid using any harsh chemicals, as these can damage the components. Additionally, be sure to avoid getting any liquid into the console, as this can cause further damage.
Cleaning the Motherboard
The motherboard should be gently wiped down with a damp cloth, being sure to avoid getting any liquid into the circuitry. Once the motherboard is clean, it can be reattached to the console.
Cleaning the Hard Drive and Optical Drive
The hard drive and optical drive should also be gently wiped down with a damp cloth. Be sure to avoid getting any liquid into the drives, as this can cause further damage. Once the drives are clean, they can be reattached to the console.
Conclusion
Taking apart a Xbox can be a daunting task, but with the right preparation and tools it can be relatively simple. Make sure to unplug the console from the power source before beginning the process, and be sure to keep track of where each component was located. Cleaning the components before reassembling the console is also a good idea, as this will help to ensure that the console is working properly. With the right preparation, taking apart a Xbox can be a relatively simple process.
Few Frequently Asked Questions
Question 1: What tools are needed to take apart a Xbox?
Answer: To take apart a Xbox, you will need a Phillips screwdriver, a small flathead screwdriver, and some tweezers. Additionally, you may want to consider using a plastic opening tool to help pry open the case without damaging the Xbox.
Question 2: How do I open the Xbox case?
Answer: To open the Xbox case, start by removing the screws from the back of the Xbox. Once the screws have been removed, you can use a plastic opening tool to carefully pry open the top and bottom of the case. It is important to be gentle while doing this as to not damage the Xbox.
Question 3: How do I remove the fan?
Answer: To remove the fan, use a Phillips screwdriver to unscrew the screws that hold the fan in place. Then, disconnect the power cable from the fan and carefully remove the fan from the Xbox.
Question 4: How do I remove the hard drive?
Answer: To remove the hard drive, use a Phillips screwdriver to unscrew the screws that hold the hard drive in place. Then, disconnect the power cable from the hard drive and carefully remove the hard drive from the Xbox.
Question 5: How do I remove the DVD drive?
Answer: To remove the DVD drive, use a small flathead screwdriver to unscrew the screws that hold the DVD drive in place. Then, disconnect the power cable from the DVD drive and carefully remove the DVD drive from the Xbox.
Question 6: How do I put the Xbox back together?
Answer: To put the Xbox back together, start by reattaching the DVD drive, fan, and hard drive. Make sure to reconnect the power cables as well. Then, carefully place the top and bottom of the Xbox case back together and secure it with the screws that were removed earlier. Finally, plug in the Xbox and test it to make sure it is functioning correctly.
How to Open an Xbox One Console
Taking a Xbox apart can be a daunting task, but with the right tools and knowledge, it can be done with ease. With the help of this guide, you have the key steps to take apart your Xbox safely and efficiently. Be sure to wear protective gear and take your time to make sure all the parts stay in their respective places. Taking apart a Xbox is a great way to learn more about how your gaming console works and how to repair it if something goes wrong. So next time you’re ready to take apart your Xbox, you’ll be prepared to do it with confidence!
Related Posts

Small businesses struggle with ERC tax credit submissions

10 Misunderstandings of the Employee Retention Credit

ERC Tax Credit 2023: Is the ERC tax credit still available?
