
How to Edit Master Slide in Powerpoint?
Editing the master slide in PowerPoint is an important task for creating professional-looking presentations. With the help of the master slide, you can customize the overall look and feel of your PowerPoint presentation by adding backgrounds, fonts, colors, and more. Whether you’re a beginner or a professional, this guide will help you understand the basics of how to edit the master slide in PowerPoint.
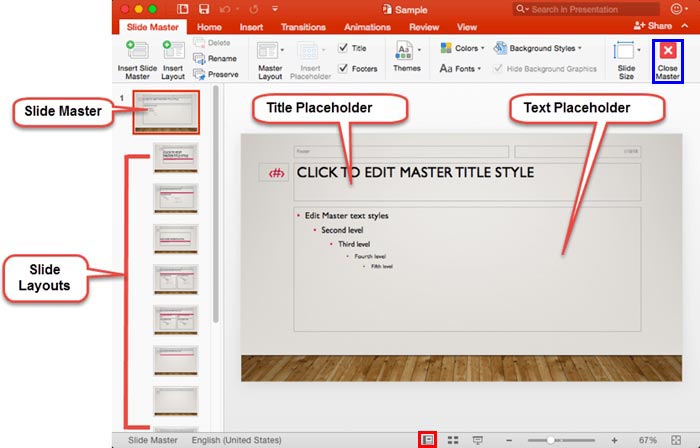
To edit a master slide in PowerPoint, follow these steps:
- Open your presentation in PowerPoint.
- Go to the View tab.
- In the Slide Master group, click Slide Master.
- Make the desired changes to the Slide Master.
- Click Close Master View.

What is a Master Slide in PowerPoint?
A Master Slide is a template for all the slides in a PowerPoint presentation. It is like a blueprint that lays out the look, feel, and design of the slides. The Master Slide can be used to change the background, text size, font, color scheme, and other design elements of all the slides in the presentation. It can also be used to add elements such as logos and footers to all the slides.
The Master Slide is a great tool for creating a consistent look and feel throughout a presentation. It can be used to quickly create a professional-looking presentation without having to manually make changes to each slide.
How to Edit Master Slide in PowerPoint?
Editing the Master Slide in PowerPoint is a straightforward process. To get started, open the PowerPoint presentation and navigate to the View tab. Under the View tab, select the Slide Master option. This will open the Slide Master view, which displays the Master Slide.
From this view, you can make changes to the Master Slide. You can change the background, text size, font, color scheme, and other design elements. To make changes to an element, simply select the element and make the desired changes.
Adding Elements to the Master Slide
You can also add elements to the Master Slide. This could include a logo, footer, or other elements. To add an element, click the Insert tab and select the desired element. You can then move and resize the element to fit the slide.
Once you are finished making changes to the Master Slide, click the Close Master View button to go back to the regular slide view. Any changes made to the Master Slide will be applied to all the slides in the presentation.
Duplicating and Deleting the Master Slide
In addition to editing the Master Slide, you can also duplicate or delete it. This can be useful if you want to create multiple versions of the same presentation. To duplicate the Master Slide, click the Insert tab and select the Duplicate Slide option. To delete the Master Slide, select the Delete Slide option.
Saving the Master Slide
Once you have finished making changes to the Master Slide, it is important to save the changes. To save the changes, click the File tab and select Save. This will save the changes to the Master Slide and make them available to all the slides in the presentation.
Using the Master Slide in PowerPoint
The Master Slide is a great tool for creating a consistent look and feel throughout a presentation. It can be used to quickly make changes to all the slides in the presentation, such as changing the background, text size, font, and color scheme. It can also be used to add elements such as logos and footers to all the slides.
Adding the Master Slide to a Presentation
To add the Master Slide to a presentation, open the presentation and navigate to the View tab. Under the View tab, select the Slide Master option. This will open the Slide Master view, which displays the Master Slide.
From this view, you can make changes to the Master Slide. You can change the background, text size, font, color scheme, and other design elements. To make changes to an element, simply select the element and make the desired changes.
Applying the Master Slide to a Presentation
Once you have finished making changes to the Master Slide, you can apply it to the presentation. To do this, click the Apply to All button at the top of the Slide Master view. This will apply the changes to all the slides in the presentation.
When you are finished making changes to the Master Slide, click the Close Master View button to go back to the regular slide view. Any changes made to the Master Slide will now be applied to all the slides in the presentation.
Frequently Asked Questions
Q1. What is a Master Slide?
A Master Slide is a template in Microsoft PowerPoint that is used to create a consistent look for all slides in a presentation. The Master Slide contains the main design elements such as the background, text, and graphics. This helps to ensure that all slides have a consistent style and look. Any changes made to the Master Slide will be applied to all the slides in the presentation.
Q2. How do you Edit the Master Slide?
To edit the Master Slide in PowerPoint, first open the presentation and select the “View” menu. From there, click on the “Slide Master” option. This will open the Slide Master view, which is the template for all slides in the presentation. Here you can edit the background, text, and graphics of the Master Slide. When you are finished, click on the “Close Master View” button to save your changes.
Q3. How do you Change the Background of the Master Slide?
To change the background of the Master Slide in PowerPoint, open the presentation and select the “View” menu. From there, click on the “Slide Master” option. This will open the Slide Master view, which is the template for all slides in the presentation. In the Slide Master view, select the “Background” option from the menu. Here you can choose from a variety of background options including color, texture, and image. When you are finished, click on the “Close Master View” button to save your changes.
Q4. How do you Change the Fonts of the Master Slide?
To change the fonts of the Master Slide in PowerPoint, open the presentation and select the “View” menu. From there, click on the “Slide Master” option. This will open the Slide Master view, which is the template for all slides in the presentation. In the Slide Master view, select the “Fonts” option from the menu. Here you can choose from a variety of font options including size, type, style, and color. When you are finished, click on the “Close Master View” button to save your changes.
Q5. How do you Add Graphics to the Master Slide?
To add graphics to the Master Slide in PowerPoint, open the presentation and select the “View” menu. From there, click on the “Slide Master” option. This will open the Slide Master view, which is the template for all slides in the presentation. In the Slide Master view, select the “Graphics” option from the menu. Here you can choose from a variety of graphic options including clipart, shapes, and photos. When you are finished, click on the “Close Master View” button to save your changes.
Q6. How do you Save the Master Slide?
To save the Master Slide in PowerPoint, open the presentation and select the “View” menu. From there, click on the “Slide Master” option. This will open the Slide Master view, which is the template for all slides in the presentation. In the Slide Master view, select the “Save As” option from the menu. Here you can choose from a variety of file formats including .ppt, .pptx, and .pdf. When you are finished, click on the “Save” button to save your changes.
How to use PowerPoint Slide Master
Editing the Master Slide in Powerpoint is a great way to ensure that your entire presentation has a consistent look and feel. With a few simple steps, you can customize the layout, graphics, and text of your slides to make them more attractive and engaging. By following these steps, you can make sure that your presentation stands out and leaves a lasting impression on your audience.
How to Embed Fonts in Pdf Windows 10?
How to Use Seagate External Hard Drive on Windows 10?
Related Posts

Small businesses struggle with ERC tax credit submissions

10 Misunderstandings of the Employee Retention Credit

ERC Tax Credit 2023: Is the ERC tax credit still available?
