
How to Make Curved Text in Powerpoint?
Are you looking for a creative way to add a unique touch to your next Powerpoint presentation? Look no further – with this tutorial, you will learn how to make curved text in Powerpoint in just a few simple steps! With curved text, you can add a visually appealing and eye-catching element to your presentation. It’s a great way to create a memorable and impactful presentation that will leave a lasting impression on your audience. So let’s get started!
Making Curved Text in Powerpoint: To make curved text in Powerpoint, start by selecting the ‘Insert’ tab and click ‘WordArt’. Choose the style you want for your curved text, type in your text, and click ‘OK’. Select the ‘Format’ tab and click ‘Text Effects’. Here, you can choose from a variety of effects to make your text curved. Finally, adjust the curve and drag the text to the desired position.
- Select ‘Insert’ tab and click ‘WordArt’
- Choose the style and type in your text
- Click ‘OK’
- Select ‘Format’ tab and click ‘Text Effects’
- Choose the desired effect to make the text curved
- Adjust the curve and drag the text to the desired position

How to Create Curved Text in PowerPoint
Curved text is an effective way to draw attention to your presentation. With the help of Powerpoint, you can easily make curved text that can be used to highlight key points in your presentation. This tutorial will walk you through the steps of creating curved text in Powerpoint.
Step 1: Select the Text Box Tool
The first step is to select the Text Box Tool from the Drawing Toolbar. To do this, click on the Insert tab and then click on the Drawing Toolbar icon. This will open a menu with a variety of drawing tools. Select the Text Box Tool from the menu and then click and drag your mouse to create a text box.
Step 2: Enter the Text
The next step is to enter the text that you want to curve. To do this, simply click inside the text box and enter your desired text. Once you’ve entered your text, you can adjust the font, size, and color of the text by using the Formatting Toolbar.
Step 3: Curve the Text
Once you have your text box and text ready, you can curve the text. To do this, select the text box and then click on the Format tab. This will open a menu with a variety of formatting options. Select the Text Effects option and then choose the Bend option from the menu. This will open a menu with different bend options. Select the bend option that best fits your needs and then click OK.
Step 4: Adjust the Curve
Once you’ve curved the text, you can adjust the curve. To do this, select the text box and then click on the Format tab. Select the Text Effects option and then choose the Bend option from the menu. This will open a menu with different bend options. Select the bend option that best fits your needs and then click on the Advanced Edit button. This will open a menu with a variety of options that will allow you to adjust the curve of the text.
Step 5: Finalize the Curve
Once you have adjusted the curve, you can finalize the curve by clicking on the OK button. This will apply the curve to the text and create a curved text effect. You can then move, resize, and rotate the text box to create the desired effect.
Tips for Creating Curved Text
Use the Right Font
When creating curved text, it is important to choose the right font. Make sure to choose a font that is easy to read and will look good when curved.
Experiment with Different Curves
Another tip for creating curved text is to experiment with different curves. Try out different curves to see which one looks best for your text.
Adjust the Size of the Text Box
Finally, you should adjust the size of the text box to fit your text. If the text box is too small, your text may be cut off or distorted.
Top 6 Frequently Asked Questions
What is Curved Text?
Curved Text is a type of text that is written in a curved shape, as opposed to a straight line. It can be used to add visual interest to a presentation, or to emphasize certain words or phrases. Curved Text can be used in a variety of programs, including Microsoft PowerPoint.
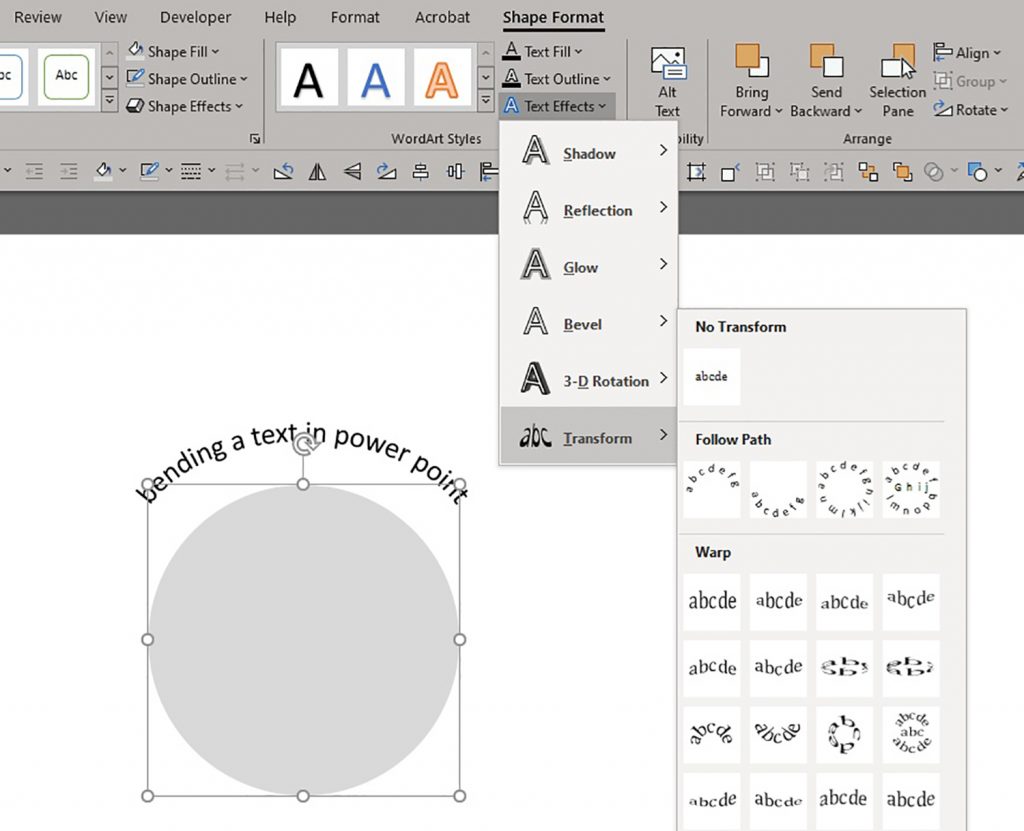
How is Curved Text Created in PowerPoint?
Creating Curved Text in PowerPoint is easy. First, open a new PowerPoint Presentation and add a text box. Next, go to the Format tab, select Text Effects and then select Transform. From there, choose the type of curve you would like to apply to your text, from Arc, Bend, Can, Wave, and more. Once you have chosen your desired curve, click Apply to save the change.
What Fonts Work Best for Curved Text?
When creating curved text in PowerPoint, it is important to choose a font that works well with the curved shape. Some fonts will appear distorted or illegible when they are curved, while others will maintain their shape. Generally, sans serif fonts work best for curved text, as they have a simpler structure and don’t contain any decorative elements.
Can I Change the Color of Curved Text?
Yes, you can easily change the color of curved text in PowerPoint. Simply select the text box with the curved text, go to the Drawing Tools tab, and select Text Fill. From there, you can choose from a variety of colors, as well as gradients and textures.
Can I Create Other Shapes with Curved Text?
Yes, you can use curved text to create other shapes, such as circles and squares. To do this, first create your curved text in PowerPoint. Then, go to the Format tab, select Text Effects and then select Transform. From there, choose the shape you would like to apply to your text, such as Circle, Square, or Diamond. Once you have chosen your desired shape, click Apply to save the change.
Can I Create Multiple Curved Texts on My Slide?
Yes, you can create multiple curved text boxes on the same slide. To do this, simply repeat the steps outlined above for each text box. When you are finished, you can adjust the size, shape, and color of each text box separately in order to create the desired effect.
How to Curve Text in Powerpoint
Creating curved text in PowerPoint is a relatively simple task that can add a unique element to any presentation. With a few clicks of the mouse, you can transform the boring, straight lines of text into exciting, curved shapes for your audience. Whether you’re a Powerpoint expert or a beginner, you can easily make your text look more dynamic and appealing with curves. Give it a try today and add a stylish touch to your next presentation!
How to Use a Controller on Minecraft Pc Windows 10?
How to Put Gif in Powerpoint?
Related Posts

Small businesses struggle with ERC tax credit submissions

10 Misunderstandings of the Employee Retention Credit

ERC Tax Credit 2023: Is the ERC tax credit still available?
