
How to Enable Network Discovery Windows 10
Do you want to be able to access shared network resources from your Windows 10 device? Network Discovery is a Windows 10 feature that allows you to find and connect to other computers and devices on your local network. In this guide, we’ll show you how to enable Network Discovery on your Windows 10 device so you can access the shared resources on your network.
Windows 10 Network Discovery enables your computer to see other network computers and devices and allows you to access shared folders, printers, and more. Here’s how to enable Network Discovery in Windows 10:
- Press Windows Key+R to open the Run dialog box. Type control /name Microsoft.NetworkAndSharingCenter and press Enter.
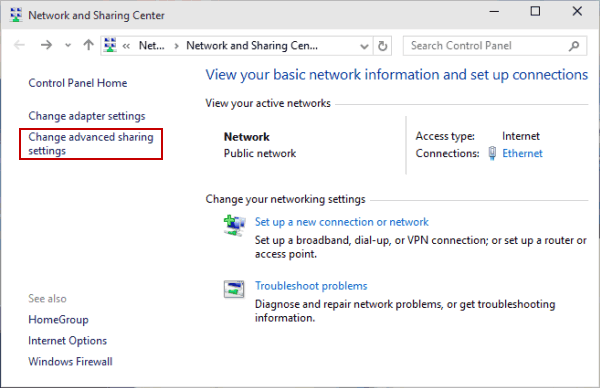
- On the left side of the window, click Change advanced sharing settings.
- Expand the Private (current profile) section. Under Network discovery, select the Turn on network discovery option.
- If you want to enable file and printer sharing, select the Turn on file and printer sharing option.
- Click Save changes.

Enable Network Discovery on Windows 10
Network Discovery is a feature on Windows 10 that allows users to search for other computers connected to the same network. It can be useful for sharing files, printers and other resources between computers. In this article, we will show you how to enable Network Discovery on Windows 10.
Step 1: Access Advanced Sharing Settings
The first step in enabling Network Discovery is to access the Advanced Sharing Settings. To do this, open the Start Menu, and type ‘Network and Sharing Center’ into the search box. In the results, click on ‘Network and Sharing Center’. This will open the Network and Sharing Center window.
In the Network and Sharing Center window, click on ‘Change Advanced Sharing Settings’. This will open the Advanced Sharing Settings window.
Step 2: Enable Network Discovery
In the Advanced Sharing Settings window, you will see several options. In the ‘Network Discovery’ section, select the ‘Turn on network discovery’ checkbox. This will enable the Network Discovery feature.
Step 3: Save Changes
Once you have enabled the Network Discovery feature, click on the ‘Save Changes’ button. This will save your changes and enable the Network Discovery feature.
Configuring Windows Firewall to Allow Network Discovery
In order for Network Discovery to function properly, you must configure the Windows Firewall to allow it. To do this, open the Start Menu, and type ‘Firewall’ into the search box. In the results, click on ‘Windows Firewall’. This will open the Windows Firewall control panel window.
Step 1: Open Advanced Settings
In the Windows Firewall window, click on the ‘Advanced Settings’ link. This will open the Windows Firewall with Advanced Security window.
Step 2: Create an Inbound Rule
In the Windows Firewall with Advanced Security window, click on the ‘Inbound Rules’ option. This will open the Inbound Rules window. In the Inbound Rules window, click on the ‘New Rule’ button. This will open the New Inbound Rule Wizard.
Step 3: Select Rule Type
In the New Inbound Rule Wizard, select the ‘Custom’ option and click on the ‘Next’ button. This will open the Custom Rule window.
Step 4: Select Program
In the Custom Rule window, select the ‘All programs’ option and click on the ‘Next’ button. This will open the Protocol and Ports window.
Step 5: Select Protocol and Ports
In the Protocol and Ports window, select the ‘TCP’ and ‘UDP’ options and click on the ‘Next’ button. This will open the Scope window.
Step 6: Set Scope
In the Scope window, select the ‘Any IP address’ option and click on the ‘Next’ button. This will open the Action window.
Step 7: Set Action
In the Action window, select the ‘Allow the connection’ option and click on the ‘Next’ button. This will open the Profile window.
Step 8: Set Profile
In the Profile window, select the ‘All’ option and click on the ‘Next’ button. This will open the Name window.
Step 9: Set Name
In the Name window, enter a name for the rule and click on the ‘Finish’ button. This will create the rule and enable Network Discovery.
Related FAQ
What is Network Discovery?
Network Discovery is a feature in Windows 10 that allows your computer to detect other computers and devices on a network. It allows your computer to automatically detect other computers, devices, and services in the same network, and then share files, printers, and other resources. This is especially useful for home networks or business networks.
How Do I Enable Network Discovery in Windows 10?
Enabling network discovery in Windows 10 is fairly simple. First, open the Control Panel, then choose “Network and Sharing Center”. On the left-hand side, there will be a link to “Change advanced sharing settings”. From there, you can choose to turn on network discovery. Make sure to select the “Turn on network discovery” option, and click “Save Changes”.
What is Required to Enable Network Discovery?
To enable network discovery in Windows 10, you will need to have a network connection. If you are using a wireless connection, make sure that your network is secure, and that you have the correct encryption settings. Additionally, network discovery requires that the network settings in Windows 10 are properly configured, such as the IP address, subnet mask, and default gateway.
What are the Benefits of Network Discovery?
The primary benefit of network discovery is that it makes it easier to share resources across a network. For example, it can be used to share files and printers between computers. Additionally, it can be used to detect devices on the network, such as media streaming devices or networked printers. This can be especially useful for businesses or home networks.
What are the Risks of Network Discovery?
Network discovery can be a double-edged sword. While it can make it easier to share resources across a network, it can also make it easier for malicious users to access the network. It is important to ensure that your network is secure, and that you have the proper security measures in place. Additionally, it is important to keep your network up to date with the latest security patches and updates.
What Should I Do If Network Discovery Does Not Work?
If network discovery is not working, it could be due to a number of reasons. First, make sure that you have enabled network discovery in the Control Panel. Additionally, make sure that your network settings are properly configured, such as the IP address, subnet mask, and default gateway. If you are still having trouble, try restarting your computer and router. If that does not work, you may need to contact your network administrator for assistance.
How To Turn On Network Discovery In Windows 10
Network Discovery is an essential tool for Windows 10 users who are looking to make their computers more accessible and connected to their networks. By enabling Network Discovery, users can easily access files, printers, and other devices on their networks. With Network Discovery, users can be sure that their computer is always connected and up-to-date. By following the steps outlined in this article, users can quickly and easily get their Windows 10 computer connected and running with Network Discovery. With Network Discovery enabled, users can enjoy the benefits of a more connected and secure network.
How to Reset Registry Windows 10
How to Delete Temporary Internet Files Windows 10
Related Posts

Small businesses struggle with ERC tax credit submissions

10 Misunderstandings of the Employee Retention Credit

ERC Tax Credit 2023: Is the ERC tax credit still available?
