

How to Add Outlook Signature?
Are you looking to create a professional email signature for Microsoft Outlook? Adding an email signature to your emails can add a level of sophistication and professionalism to your communications. An email signature also serves as a way to provide contact information, such as your website or phone number, to your recipients. In this article, you’ll learn how to create an email signature in Microsoft Outlook.
How to Add Outlook Signature?
Adding an Outlook signature is easy and straightforward. Here is a step-by-step guide:
- Open Outlook and go to the File tab.
- Select Options and then select Mail.
- Go to the Signatures tab and click on the New button.
- Type in the signature name and create your signature.
- When you’re done, click on the OK button to save the signature settings.
That’s it! Your Outlook signature has been added.
Instructions to Add Outlook Signature
Adding an Outlook signature to your emails is a great way to personalize your messages and help them stand out from the crowd. This guide will walk you through the steps required to create an Outlook signature for your emails.
Step 1: Create an Outlook Signature
The first step to creating a signature for Outlook is to create the signature itself. This can be done by writing out your desired signature line-by-line in a text editor, such as Notepad. Be sure to use proper HTML tags to format the text and indicate which parts of the signature should be bold, italicized, or underlined.
Once you have the signature written out, you can begin adding images and other content to your signature. This can be done by using HTML tags to embed an image or a link to an external website. When adding images, be sure to use an image hosting service such as Imgur or Photobucket, as Outlook does not support direct image links.
Step 2: Add Signature to Outlook
Once the signature has been created, it’s time to add it to Outlook. To do this, open the Outlook application and select the “Signatures” tab from the ribbon. From here, select the “New” option to create a new signature. Enter the desired name for the signature and then select “OK.”
Step 3: Format Signature
The next step is to format the signature to your liking. To do this, select the “Format Text” tab from the ribbon and then select the desired formatting options. For example, you can choose to make the text bold, italic, or underlined. Additionally, you can adjust the font and font size of the text.
Step 4: Add Signature to Email
Once the signature has been created and formatted, it’s time to add it to an email. To do this, open a new message and select the “Signature” tab from the ribbon. From here, select the desired signature from the dropdown menu. The signature will automatically be added to the bottom of the message.
Step 5: Test Signature
The last step is to test the signature to make sure it is displaying correctly. To do this, send a test email to yourself and then open the message. If the signature appears correctly, you’re all done. If not, you may need to adjust the formatting or double-check the HTML tags.
Tips for Creating an Outlook Signature
Keep it Simple
When creating an Outlook signature, it’s important to keep it simple. Don’t add too much text or too many images, as this can make the signature look cluttered and unprofessional.
Be Consistent
It’s important to be consistent when creating an Outlook signature. Use the same font, font size, and formatting for all emails to ensure that your signature looks professional and consistent.
Add Your Company Logo
If you’re sending emails on behalf of a company, it’s a good idea to add the company logo to the signature. This helps to reinforce the company’s brand and make the emails appear more professional.
Keep it Updated
Finally, it’s important to keep your Outlook signature up-to-date. If you make any changes to your contact information or job title, be sure to update the signature accordingly.
Related FAQ
What is an Outlook Signature?
An Outlook signature is a small piece of text that is automatically added to the end of an email message. It usually includes contact information such as your name, title, phone number, and email address. It can also include a picture, logo, slogan, or other information. The signature is added to the bottom of your emails as soon as you hit “send”, so it’s a great way to make sure your emails are properly identified.
How do I Create an Outlook Signature?
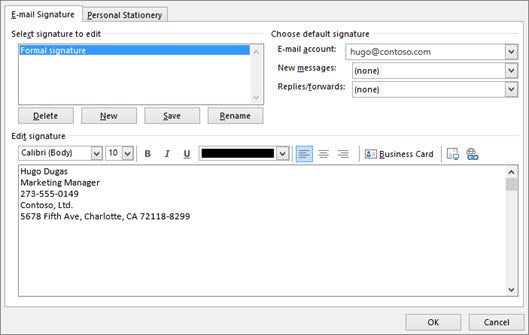
Creating an Outlook signature is a fairly simple process. First, open Outlook and go to the ‘File’ menu. Then select ‘Options’, followed by ‘Mail’. Under the ‘Signatures’ tab, click the ‘New’ button. This will open a window where you can enter your information and customize your signature. You can add text, images, and HTML code to your signature. Once you’re finished, click ‘OK’ to save your changes.
How do I Add an Outlook Signature to an Email?
To add an Outlook signature to an email, open a new message and click the ‘Signature’ drop-down menu in the top right corner of the window. From here, you can choose which signature you want to add to the email. Once you’ve selected your signature, it will be automatically added to the bottom of the message.
How do I Edit an Outlook Signature?
To edit an Outlook signature, open Outlook and go to the ‘File’ menu. Then select ‘Options’, followed by ‘Mail’. Under the ‘Signatures’ tab, select the signature you want to edit and click the ‘Edit’ button. This will open a window where you can make changes to your signature, such as adding text, images, and HTML code. Once you’re finished, click ‘OK’ to save your changes.
Can I Have Multiple Outlook Signatures?
Yes, it’s possible to create multiple signatures in Outlook. To do this, open Outlook and go to the ‘File’ menu. Then select ‘Options’, followed by ‘Mail’. Under the ‘Signatures’ tab, click the ‘New’ button. This will open a window where you can enter your information and customize your signature. Once you’re finished, click ‘OK’ to save your changes. You can repeat this process to create additional signatures.
Can I Use HTML in my Outlook Signature?
Yes, you can use HTML in your Outlook signature. To do this, open Outlook and go to the ‘File’ menu. Then select ‘Options’, followed by ‘Mail’. Under the ‘Signatures’ tab, select the signature you want to edit and click the ‘Edit’ button. This will open a window where you can add HTML code to your signature. Once you’re finished, click ‘OK’ to save your changes.
How to Add Signature in Outlook
Adding an Outlook signature to your emails is a great way to make your emails look more professional and organized. It is also a great way to give yourself a little bit of extra promotion. With just a few steps, you can easily add an Outlook signature to your emails and make sure that your emails stand out from the crowd. So take the time to add an Outlook signature to your emails and make sure that your emails look professional and organized.
Related Posts

Small businesses struggle with ERC tax credit submissions

10 Misunderstandings of the Employee Retention Credit

ERC Tax Credit 2023: Is the ERC tax credit still available?
