How to Make a Booklet in Microsoft Publisher 2007?
Are you looking for a way to create a professional-looking booklet in Microsoft Publisher 2007? Look no further! In this article, we will show you how to make a booklet in Microsoft Publisher 2007 quickly and easily. With just a few simple steps, you’ll be able to create a booklet that looks professional and will be ready to print and share with family and friends. So, if you’re ready to get started, let’s dive in and learn how to make a booklet in Microsoft Publisher 2007!
Making a Booklet in Microsoft Publisher 2007:
- Open Microsoft Publisher 2007.
- Click the “Publications for Print” option.
- Choose the “Booklet” template.
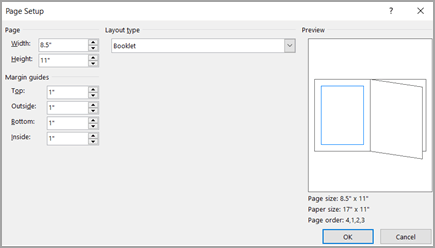
- Adjust the size and orientation of the booklet.
- Enter the text, images and other content.
- Check the booklet to ensure that the content is laid out properly.
- Save the booklet.
- Print the booklet.

Creating a Booklet with Microsoft Publisher 2007
Microsoft Publisher 2007 is a desktop publishing program that makes it easy to create professional-looking documents, including booklets. This guide will walk you through the steps of creating a booklet using Microsoft Publisher 2007.
Step 1: Choosing a Booklet Template
The first step in creating a booklet in Microsoft Publisher 2007 is to choose a template. To do this, open Microsoft Publisher 2007 and select “Page Design” from the main menu bar. Then, select the “Booklet” folder from the “Publications for Print” section. Once the booklet templates appear, select the template that best suits your needs.
Step 2: Customizing the Template
Once you have selected the template, you will be able to customize it to meet your needs. To do this, select “Insert” from the main menu bar and choose the type of content you would like to add. For example, you may choose to insert pictures, text boxes, shapes, tables, and more. To modify the formatting of the text, select the text and use the menu bar to adjust the font, size, color, and other text options.
Step 3: Adding Pages
When you have finished customizing the template, you will need to add pages to the booklet. To do this, select “Page Layout” from the main menu bar and select “Insert Page.” You can also add a page using the “Page Numbers” feature, which allows you to add blank pages at the beginning or end of the booklet.
Step 4: Finishing the Booklet
Once you have added all of the pages to the booklet, it is time to finish it. To do this, select “File” from the main menu bar and select “Print.” This will open the Print dialog box, where you can select the number of copies and other printing options. When you have finished, click “OK” to print the booklet.
Step 5: Saving the Booklet
When you have finished printing the booklet, you can save it for future use. To do this, select “File” from the main menu bar and select “Save As.” This will open the Save As dialog box, where you can select the folder and file type you would like to save the booklet as. Once you have selected the save location and file type, click “Save” to save the booklet.
Top 6 Frequently Asked Questions
Q1: How do I start a new booklet in Microsoft Publisher 2007?
A1: To start a new booklet in Microsoft Publisher 2007, first open the program and click “File” and then “New”. From here, choose “Publications for Print” from the list of available publication types. In the “Publication Types” box, click the “Booklets” folder and select the booklet type you want to create. Click “Create” to open the booklet.
Q2: How do I add text to the booklet?
A2: To add text to the booklet, select “Text Box” from the “Insert” menu. Click and drag to draw the text box on the page. Enter the desired text into the text box, and then adjust the font, size and color by selecting the text box, clicking “Format” and then choosing the desired options.
Q3: How do I add images to the booklet?
A3: To add images to the booklet, select “Picture” from the “Insert” menu. Select the desired image from the file browser and click “Insert”. The image can be moved and resized by clicking and dragging on the image handles. To make further adjustments to the image, select it and click “Format” to access the image options.
Q4: How do I add page numbers to the booklet?
A4: To add page numbers to the booklet, click “Insert” and then select “Page Number”. Choose the desired page number format from the list of available options. To add the page numbers to the entire booklet, click “Apply to All Pages”. To add page numbers to specific pages, click “Apply to Current Page”.
Q5: How do I create a table of contents for the booklet?
A5: To create a table of contents for the booklet, click “Insert” and then select “Index and Tables”. From the list of available options, select “Table of Contents” and click “OK”. In the Table of Contents dialog box, select the text that will be used for the table of contents and click “Mark”. Once all of the desired text has been marked, click “Insert” to insert the table of contents.
Q6: How do I print the booklet?
A6: To print the booklet, select “Print” from the “File” menu. In the “Print” dialog box, choose the desired printer, set the page range and click “OK”. To ensure that the booklet prints as one complete document, select “Booklet Printing” from the “Print What” drop-down menu. Finally, click “Print” to print the booklet.
Making a booklet in Microsoft Publisher 2007 is a great way to create a professional-looking document. With the guidance of this article, we have seen that it is not as intimidating as it may seem. With the right steps and guidance, users of Microsoft Publisher 2007 can easily create a booklet to share with their audiences. So, don’t hesitate to give it a try and create your own booklet today!
Is There a Mac Version of Microsoft Publisher?
How Much is Microsoft Publisher?
Related Posts

What if You Forgot Your Microsoft Account Password?
What to Do if I Forgot My Microsoft Account Password?
What is My Microsoft Account Name?

What if You Forget Your Microsoft Account Password?